Quantcast
Channel: Epsilon's Amiga Blog
Viewing all 215 articles
Browse latest View live

Adelaide Amiga 30 Meeting Report

$
0
0
On Monday May 25th from 7:30pm we had the Adelaide Amiga 30 Meeting, celebrating the 30th anniversary of the Amiga in Adelaide! This was hosted by the Adelaide Amiga User Group at Clarence Park Community Centre.


With the introduction of the Adelaide Amiga User Group website to promote the event, as well as promotion via amiga.org and Retrospekt (who sent three members to our gathering tonight), we had a full room and lots of people and lots of Amigas on show!


There really was a lot of interest in the Next Gen Amigas I brought to the meeting, Sam 460CR running AmigaOS 4.1 Final Edition, Powerbook G4 running MorphOS 3.8 as well as the CDTV running music, and booting games and demo disks from the Gotek Floppy drive emulator during the evening:


Of course there were other Amigas on display too, with plenty of interest too:


Amiga 3000 on display here, in need of some work though:


An Amiga 1200 as well - Plenty of Strider and Turrican 3 was played on this machine tonight.


An Amiga 4000, Amiga 500, Amiga 1000, Amiga 1200 and Amiga 3000 on display:


Not Amigas related, but Commodore related - a Commodore PET computer was being demoed as well:


I had never seen a PET in the flesh before:


Some more photos of the A1000, A1200 and A4000:


It was great to see so many Amigas on display tonight - a fitting tribute to the 30th Anniversary of the Amiga:


What was truly great was we had plenty of people and lots of positive interest in the new developments in the Amiga, particularly Next Generation Amiga systems:


There was even a Chameleon 64 running C64 emulation on the night too:


I opened up the Sam460 CR and there was plenty of interest in it, and lots of questions about AmigaOS 4.1, MorphOS, where to buy them and questions, questions, questions! It was great though, and I hope a few people decide to try these new systems out themselves - they prove that Next Generation Amigas are still fun in 2015:


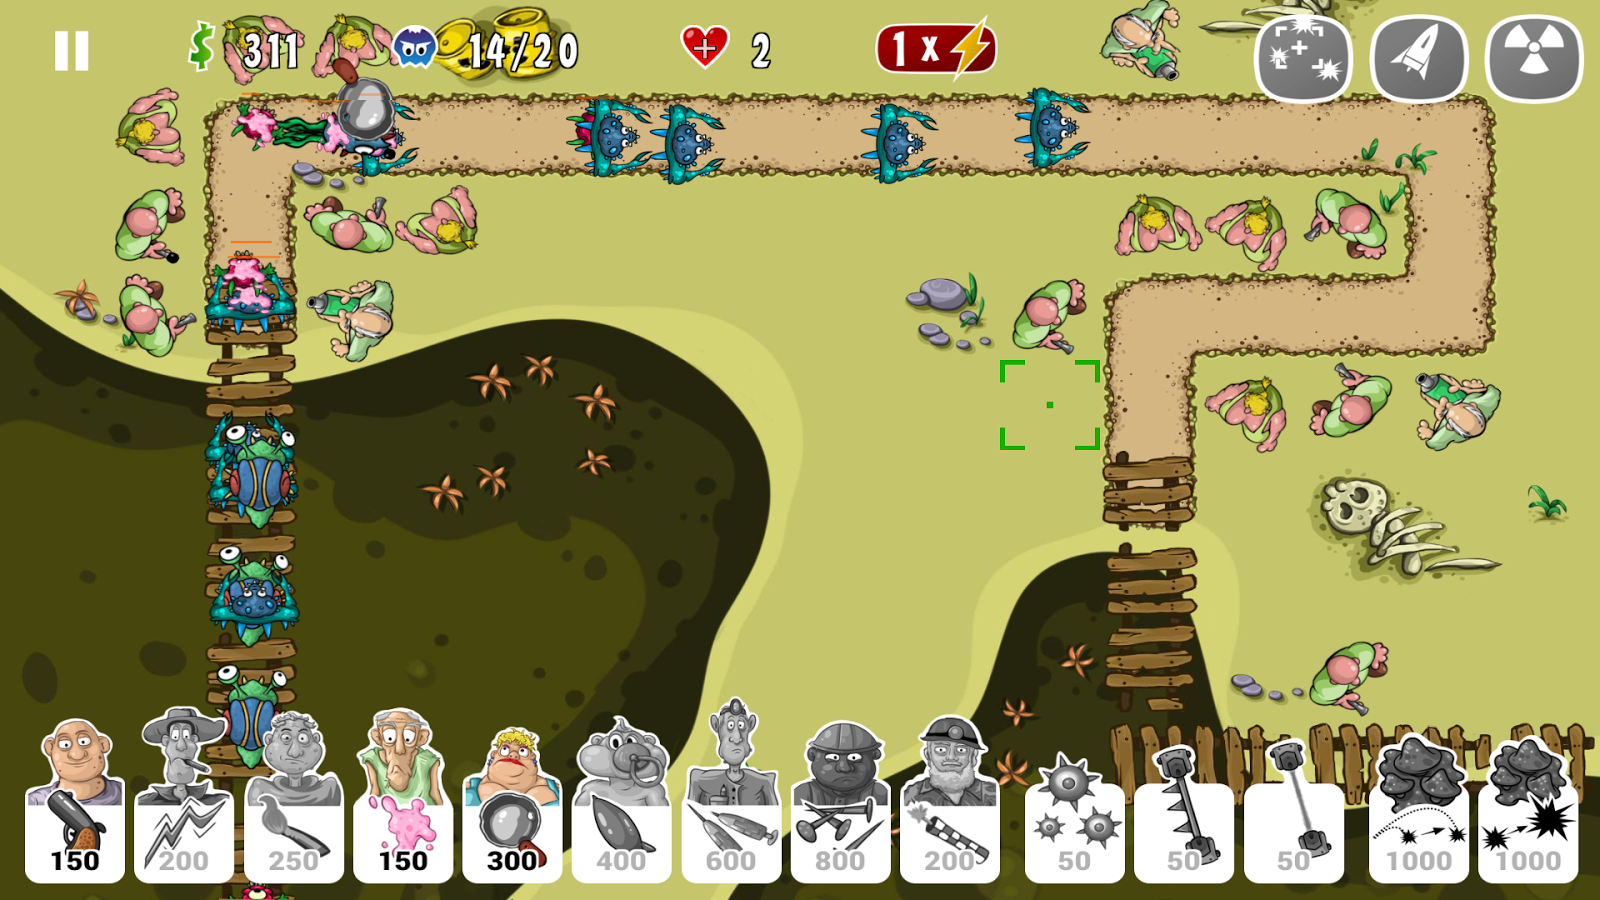
I was showing a demo of the recently released Swamp Defense 2 game on the Sam 460CR:


Shadow of the Beast running on an Amiga 1200:


People were happy to play with the machines and try things out which was great to see:


I then started up a Wings Battlefield LAN gaming session between the Sam 460CR AmigaOS4.1 Final edition machine and Powerbook G4 MorphOS 3.8 machine - the game was very popular and I had lots of very positive feedback on how much fun it was to play and how easy to get into - the game is due to be released very shortly:


Close ups of the action as the rounds continue in Wings Battlefield LAN game:


I think LAN gaming has a real future on Amiga systems - and especially when setup at meetings:


I had a quick look at an Amiga 4000 that was not very happy - it booted ok, but no fast memory recognised.


Closer inspection of the board revealed extensive battery corrosion, which I suspect is the cause of the issue - unfortunately I couldn't fix that!


Adelaide Amiga 30 was a truly great event and a lot of fun! I was so happy to see a lot more people there than the last meeting, and continued interest in the latest developments on the Amiga.

Can't wait for the next meeting!


MultiviewerNG Sneak Preview for AmigaOS4.1 on Sam460CR

$
0
0
Today I want to take a sneak peak at a preview version of MultiViewerNG on AmigaOS 4.1 FE, written by Andy 'Broadblues' Broad for A-Eon Technology Ltd, in development for over 6 months and soon to be released on AMIStore.


I have been offered a sneak peak at this software by A-Eon - thanks for this! I have been testing it on my Sam 460CR. (click on any images in this post to expand)


It is coming to AMIStore very soon - officially called MultiviewerNG for AmigaOS4.1 - I shorten the title to Multiviewer in this blog post as the software is called Multiviewer everywhere else:


There should also be a version for Classic Amigas as well, but this blog entry is focused on the AmigaOS 4.1 version.

Once the Multiviewer software is downloaded and extracted you have the following drawer, which contains the installer to set things up for Multiviewer:


As Multiviewer is a replacement for the AmigaOS Multiview utility, it needs to make some changes to your system to make Multiviewer the default instead - you don't have to make Multiviewer the replacement for Multiview if you don't want to, and you are given the option during the installation:


An assign for Multiviewer: is created in s:user-startup for wherever you choose to install the program.

Once installed, I opened Multiviewer and load an image to start with:


There is a toolbar across the top with the various options available, which are:


1. Open
2. Save
3. Print
4. Information

5. Slideshow of all files in File List
6. Previous file
7. Next file

8. Mark Section
9. Copy
10. Paste
11. Clear Selection
12. Edit File

13. Rotate Image Anticlockwise 90 degrees
14. Rotate Image Clockwise 90 degrees

15. Zoom
16. Show image unscaled at full resolution
17. Rescale image to Fit window
18. Rescale image to Fill window

You can move the mouse pointer over each icon for a description of what it does.

As with Multiview, Multiviewer uses AmigaOS Datatypes to display files. Unlike Multiview, Multiviewer supports multiple files at the same time, and allows manipulation of images too.

In the above example you can see the image doesn't fit in the display window of Multiviewer, with scroll bars to view the rest of the image.


If I click on the  Fit button, it will resize the image proportionally to fit the window size, as below:


I can also rotate the image left or right - very useful for images from cameras and smartphones where the image was taken in portrait mode and needs to be adjusted:.


I can also use the Fill option, which will resize the image to fill all of the screen display and provide a scrollbar for the bits that don't fit:


If I then open another image, it is added to the file list on the left hand side. This enables me to quickly select either one for viewing:


There are buttons at the bottom of the File List section to clear the file list, add files, remove files, and to move files up and down the list.

I can also copy a section of the image by selecting Mark (from the top toolbar) - then drag the bars around the section you want, and then click on Copy:


I can then open a new tab (like a tabbed browser) by right clicking and selecting the Project > New Tab option as below:


I now get a blank tab, into which I can load another image/file:


I can also paste the contents of the image I copied earlier into this tab - note the tab name changes to the Clipboard 383 title now:


I can then save this new cropped image by right clicking on it, and select Project > Save Image As > and then choose your preferred image format - ILBM, JPG, PNG or TIFF:


I chose PNG, and then called it test.png and saved it.

You can also apply different filters to the types of files you want to be able to see with Multiviewer - via right click,  Settings > Filter by:


As mentioned you can open text files too, an example below is the included Multiviewer.doc file:


You can click Edit button to edit the document in Notepad - this can be reconfigured via the icon tool types for Multiviewer as desired (eg. if you prefer a different editor for a datatype) - Picture editing lines are shown below as an example:


Note that if you find you have issues opening a particular datatype(s), you may find that uncommenting (NOCACHING) to NOCACHING in the icon tool types (as shown above) may help with it - it worked for me.

You can also search for text within text files when open in Multiviewer. The image manipulation icons in the toolbar change when looking at a text file to a new set of text specific options:


1. Search Text
2. Find next occurrence
3. Find previous occurrence

When clicking on Search Text button, you get the following window pop up to enter the search text, case sensitive and which direction to search in:


Results of the search for 'SDK' in S:user-startup file:


Note that if there is not a datatype in the Dev/Datatypes and Classes/Datatypes folder for the file you are trying to view, it will not display in Multiviewer. You can add extra datatypes though - more on this soon.

 You can also choose to hide the File List and toolbar icons, if for example you prefer a clean Multiview classic style look or want to maximise the image viewing area - this option is available by right clicking, then selecting Navigation > Show File List (or press F7) or Navigation > Show Toolbar (or press F9):


You can also maximise, minimise or even open Multiviewer on it's own screen - very helpful if you have dual monitors, or if you just want to have it running on it's own screen with one display:


Here is a GIF in Multiviewer - I tested many of the common image formats:


You can click on the Slideshow toolbar button to automatically show all photos in the file list, with a short delay between each one:


You can also playback sounds through Multiviewer - I show examples below like a WAV file and 8SVX sound file:


I can also view/interact with AmigaGuide files through Multiviewer:


As with Multiview, you can download additional AmigaOS4 Datatypes from OS4depot.net and install them to add additional filetype functionality to Multiviewer.

Example datatype I tried is Mpegadt from OS4depot here that you can use to playback MP3 files in Multiview and now Multiviewer:


Once installed, MP3 files can then be played back through Multiviewer - here I have two different mp3's in two tabs:


Multiviewer has a lot to offer, is a big improvement over the classic Multiview and I think it will only get even better over time! It is well worth getting Multiviewer when it comes out!

Interview on Adelaide Amiga User Group Website

3 Years of this blog!

$
0
0
It has now been three years since I started this Amiga X1000 blog!


As I hit the 3 year mark, I do sincerely hope this blog has been useful and helpful in helping other X1000 owners to enjoy their systems more.

I also hope that other Amiga users (Classic and Next Generation) have enjoyed reading this blog for the past 3 years.

I have tried my best to show why Amiga systems are still fun in 2012-2015, now 30 years after the first Amiga 1000 was released in 1985!


It is a shame that I couldn't celebrate the 3 years with my X1000, which inspired me starting this blog originally. It is being looked at over in the UK by AmigaKit and Varisys.

While waiting for my X1000 to be sorted out though I haven't wallowed in unhappiness - in fact, quite the opposite!

I have moved on (as you may know) by buying a new Acube Systems Sam460CR to run AmigaOS4.1 Final Edition and I have covered plenty of new AmigaOS developments since then on this blog. (I also have looked at MorphOS 3.8, 3.9 and Classic Amiga stuff too!)

I am very grateful to have the Sam 460CR system to use:


This year I have been particularly active with blogging about various Classic and Next Generation Amiga topics, podcasts, interviews and getting involved more in local Adelaide based Amiga events and website/facebook promotion to try to engage with the local Adelaide Amiga community here and show them what is happening for Amiga in 2015!

Thanks for following my blog so far, and rest assured there will be plenty more good stuff to come!

Warp3D working on my Sam460CR

$
0
0
I am very glad to say that today I now finally have Warp3D Southern Island drivers working under AmigaOS4.1 Final Edition on my Sam460CR!


The solution works because I found a low profile 1-slot Sapphire Radeon 7750 1GB DDR5 PCI-E graphics card cheaply on Ebay!

My other cards that work with the Southern Island Warp3D drivers (intended for my X1000) are only 2-slot cards, and so they don't fit in the Sam460CR as the PCI needed for the SATA card is directly underneath the PCI-E card slot.

Here is a close up of the card:


A view of the backside of the card, showing the model number and other details for those who want to hunt down this card themselves (click to expand any of the photos):


Here it is, now installed in the system. Really. Not. Much. Room in there!


Because it is a low profile card, I needed to remove the backplate for now as I don't have a full length backplate that fits the card (the card was second hand).

Before installing the new card I had already previously installed on AmigaOS4.1 Final Edition the Warp3D Southern Island Drivers (available for purchase on AMIStore App Store), and also the updated Radeon HD 2.7 Drivers (also available for purchase on AMIStore).


I turned on the Sam460CR and it worked immediately - picked up the Radeon 7750 and Workbench worked as normal. But of course, Workbench is not what this upgrade is all about...

Here is a Warp3D demo called "The Trip" running on the Sam460CR:


It's been so long since I had Warp3d (using a much slower 9250 PCI card) - I forgot how great it looks:


After this demo finished, I moved on to run some of HunoPPC AmigaOS4.1 games, which need Warp3D to run, such as Secret Maryo Chronicles:


Some other Huno PPC games I tried included Patience Mahjongg:


I also enjoyed playing Equilibrio again:


Another Warp3D game I have for AmigaOS4.1 is F-1 Spirit:


It is nice to be able to play this game again, although I am still terrible at it:


Hyperion's Quake 2 AmigaOS 4.1 port runs nicely in Warp3D, but make sure to use the 8-bit sound drivers rather than 16 bit to avoid some strange audio issues I encountered:


Hexen II was next up, and I am glad to be able to run some nostalgic 3D games using the new Warp3D drivers:


Moving forward now quite a number of years to VoxelNoid:


I also took a look at Nexuiz, but it is too slow on the Sam460CR to be playable. It is better on the X1000 of course but I can't test that unfortunately...


Last but not least I tried out Aquaria, which runs great again:


I have looked at most of these games on my blog in the past so I won't rehash old ground again here.

I still intend to play around a lot more with Warp3D, but I was so happy to finally have this working on the Sam460CR I just had to quickly show it off! :-)

AmigaOS4.1 Games released and holiday

$
0
0
Today I thought some quick updates on some new AmigaOS4.1 game releases - Quake 2 High Definition Edition from HunoPPC on AmigaOS4.1 with Warp3D, The Secrets of Middle City Demo Version, and more.

First, a look at a upgraded Quake2 High Definition release from HunoPPC for AmigaOS4.1, which was quietly released recently.

It definitely improves the look of Quake 2 on AmigaOS4.1 with higher HD resolutions, but of course you need to have Warp3D working on your system.


You can download the 400MB+ archive from HunoPPC's website here. You also need to copy some of the original Quake2 files from your original Quake 2 CD. The instructions on HunoPPC's website explain which file to copy where.

On the Sam460CR I find that running the game in 1024x768 gives the best results, but I am sure on an X1000 I could run much higher resolutions. Here is the title screen:


Video options screen:


Of course, I need some in game screenshots to show the game off. Here are some screenshots in the game to whet your appetite while waiting for it to download:


Definitely worth the sizeable download in my opinion. Thanks to HunoPPC for his efforts with this.

Also released recently is a demo of the upcoming The Secret of Middle City game for AmigaOS4.1 (and MorphOS) by GDG Entertainment. Their website is here.


I ran the game demo of The Secret of Middle City on my Sam460CR system to bring you some screenshots of what you can expect from the game. Here is the title screen:


There is an intro sequence that provides the background to the mystery to solve:


The game is broken into several parts:


As the game opens you head into the Police Entrance Hall:


As is usual with this type of game, you can interact with various people and objects on the screens, to progress to the next part - you cannot save your progress in the demo version:


 I quickly move onto to the Sheriff's office for more story and interactions as more information is revealed for the next steps in the story:


You get different responses depending on which questions you ask - in my case it seemed I had to click on them all before I could progress but maybe I was just unlucky with my choices:


 Clicking on the Map shows the Middle City area to explore:


Exiting the Police building, I head to the bar for more clues (where better!):


Some screenshots from the bar:


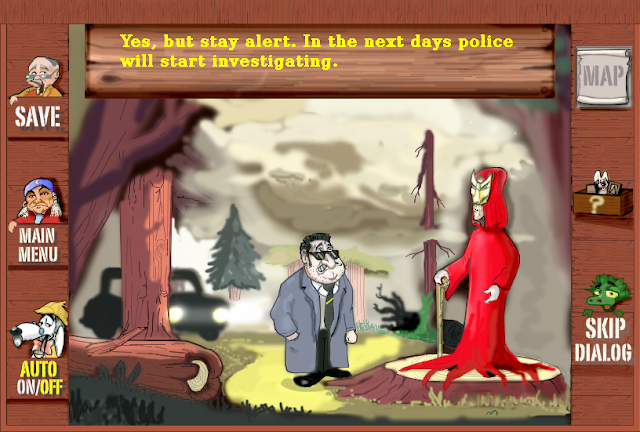
Clicking on the box icon with the ? on it (on the right side) reveals what items you have collected or want to give/use to progress further:


The Windows/Mac version of this games was released this week, so the boxed AmigaOS4.1 version should not be far away hopefully so everyone can try this game out.

Last, but not least I received my purchased boxed copy of Wings Battlefield in the post this week.


It also gave me the opportunity to try out the Warp3D version of Wings Battlefield for the first time, now that I have Warp3D running on my Sam 460CR.

Up until now I have run the compositing version of the game, but now I can try out the Warp3D version:


Certainly it looks nicer, but people running the compositing version are not missing out on much in my opinion - the impressive work on making the compositing version as nice as possible has really paid off. Both version looks great. Here is some photos of the Warp3D version in action on my Sam460CR:


Until now I have been using the pre-release version I was testing, so it is great to have the final release version! There was an upgrade to install on first run after installing from the CD. The updates are downloaded from the internet and installed automatically, and the game then run again.

Playing this game again made me release how great it is to have new release AmigaOS 4.1 games in 2015.


There is also a Windows version included on the CD (haven't tried it yet), along with AmigaOS 4.1 (Compositing and Warp3D versions), AROS, MorphOS versions, and some extra goodies too.

Please note that I will be on holiday for a while from this week, with no access to my Amiga systems during that period. I am looking forward to doing some train trips of a lifetime! I would expect plenty of coverage on my Interesting Trains Blog once I return!

I also hope to have some updates for you on my X1000 and what has happened in Amigaland while I am away, when I return.

Accordingly, in the meantime the blogs will pause for a bit, but should be back in mid August.

Until then I hope you continue to enjoy using your Amiga systems, Next Generation or Classic!


Bubble Shooter DX on AmigaOS4 using Sam460CR

$
0
0
I am back from my holiday and turned on my Sam460CR system today to find out a new game called Bubble Shooter DX by Entwickler-X available on AMIStore!


Essentially Bubble Shooter DX is a copy of the famous Bust-A-Move game, which I really enjoyed playing on the Dreamcast, Nintendo 3DS and other systems too!

There are some twists to it though, in the form of earning coins that you can use to help you out of tough situations - but more on that later.

In the past Entwickler-X has sold their AmigaOS4.1 games via their website Amiboing and AMIStore, but this release is available on AMIStore only for AmigaOS4.1:


You can download a demo of the game from Amiboing here if you want to try it out first!

The game costs GBP6.50 on AMIStore.

Once I purchased and downloaded the game from AMIStore to my Sam460CR system, I get the following drawer:


A readme is included to explain the game - it is short because the game itself is easy to get into:


As with most Entwickler-X games you can use the Config program to run the games in full screen or window mode:


When the game runs this is the initial screen:


If you click on the Star icon you can see the achievements you can unlock in the game:


A highscore chart and the ability to mute the sound effects is also included:


Hitting Play I can see the levels, with just the first level available initially, but I can unlock these as I finish each one, and can continue from any level I have unlocked in the future, which saves me having to start again each time:


Level 1 - let's get into it!


The initial game screen. As per Bust-A-Move you shoot different coloured bubbles from a cannon you control with the mouse. When you shoot a coloured bubble next to two other bubble of the same colour they all disappear. The goal being to remove all the bubbles before the line reaches your cannon position at the bottom of the screen:


You can use the right mouse button to switch between the current colour available to shoot, and the next one in the sequence. This is very useful as the levels get more complex. Level 1 though, is very easy:


Moving through the levels is quick, and I am quickly into Level 3 and 4 - with the arrangement of bubbles changing with each level - you can shoot off the dashed lines making the edge of the play area to get bubbles to hard to reach places:


Moving forward a few levels, level 9 things are starting to get more difficult:


Level 12 and you can see the arrangements are getting more difficult - some special bubbles (clear) and explosive bubbles that destroy all the bubbles of the same colour also start creeping in:


Personally I found the first levels too easy, but I have played Bust-A-Move a lot, so probably it is because of that! But moving into Level 13 and 14, things get tougher:


Indeed, on level 14, I made some mistakes and lost!


You can see the unlocked levels now, and my achievement out of 3 stars for each one, based on how quickly I solved it:


I also now have a score on the high score table! As with other Entwickler-X games these scores are registered with your Amiboing profile on their website, so you can compete with other players scores across the world!


If you change the theme from clean to symbol, the game area changes a bit, with the bubbles have symbols as well as colours:


You can also buy power-ups using coins earned through completing levels, such as popping bubbles, moving the line up one, and popping all bubbles on the screen with the same colour. Used strategically, these can really help as you move through the game and the levels get harder.


Bubble Shooter DX is an interesting game. It plays as you would expect if you have played Bust-A-Move before, but has enough variations to make it interesting.

I would have liked some background music in the game, but spot effects are fine.

It is a fun game and if you enjoy Bust-A-Move style games then you should enjoy this too!

Inside my A4000T

$
0
0
The Amiga 4000T. Produced in very small numbers in the last few months of Commodore in 1994 before it went bankrupt, and briefly again by Amiga Technologies in 1996. I thought since I had the system opened up to fix an issue with the hard disk and sound output, I would share some photos of this heavily upgraded machine.


This A4000T (PAL Version) was purchased about ten years ago second hand, base setup with no expansions in it. I had to sell a lot of other systems to have the money to get this one, even back then they were pricey!

It is the later Amiga Technologies built version. The dent in the top back was done during shipping the computer to me in Adelaide. I found a big dent in the box on that corner and sure enough...oh well, can't exactly get a new one..


Opening the front cover, I have a DVDROM IDE drive, and 2 SCSI CDROM drives, and just the one high density floppy disk drive, as the IDE hard disk occupies the other blanked slot - it means all the bays are full:


The buttons at the top are power button, Reset button, and Internal speaker output on/off - yes, it has an internal speaker!

Rear view of the A4000T - the case is big, bulky and heavy. A typical PC AT high tower case of that era. Not as bad as a A3000T from what I have been told - never owned or tried to lift an A3000T. The back says Made in Taiwan and the label says Made in the USA...


The A4000T uses multiple module cards for all the I/O ports, rather than being included on the main motherboard, as they are on other Amiga's. In the next shot you can see the SCSI external connector (with DIP switches for the SCSI settings so you don't need to open the case to adjust them).

Below that is the Indivision AGA MK2 DVI out (for native Amiga output graphics), Audio/Video module card with RGB port (not used) native Amiga RCA audio out - which is fed back into the case to be mixed via AUX IN into the PCI sound card output. The PCI sound card has a DSP that can decode MP3's in hardware, meaning the 060 is not needed to playback MP3's! :-)

Moving on is the PCI 10/100 network card, 3dfx Voodoo3 PCI graphics Card (which runs the Workbench screen), and the first of the USB ports connected to the Deneb USB card internally.


Some of the cards are offset because of the PCI bridge board which means the PCI cards are higher than normal...

Because the A4000T has IDE and SCSI support, technically a separate SCSI card or IDE card is not needed.

However, I did add a Buddha IDE Zorro card as I wanted buffered IDE ports to minimise potential damage to the hard disk and provide more IDE ports.

Also installed in the case is a USB Deneb Zorro card (including OS3.9 patches in ROM for one boot to bootup), and a IDE 320GB Hard disk (running SFS partitions).

Opening the case reveals a labyrinth of cables - the SCSI cable is stretched to it's limit to reach both CDROM drives, positioned over the Cyberstorm 060 accelerator with 64MB memory. I have 128MB in my A4000D Cyberstorm 060 card but I never needed to transfer it to this machine so far...


View from the bottom shows the Mediator PCI A4000T bridge board which adds many PCI slots to the Amiga 4000T whilst still allowing most Zorro slots to be used as normal (zorro riser is needed in some cases depending on what cards you have) - you can also see the PCI sound card and 3dfx card in this shot:


I was pleased that after just reseating everything inside the A4000T, the machine worked as normal again and the issues I was having with the hard disk booting and sound output just went away! I was very happy it wasn't more complicated!


This system runs AmigaOS 3.9 BoingBag 2 with AmigaSYS4 AGA.

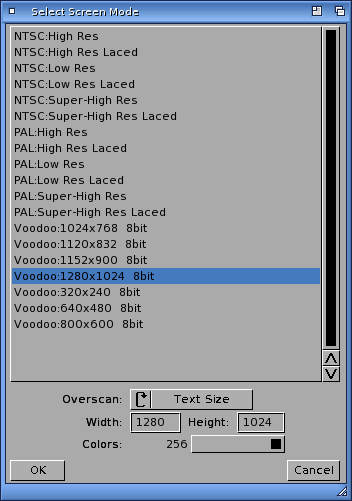
One TFT display is to show the 1280x1024 resolution 24 bit colour Workbench, and the other TFT screen to output the scan doubled Indivision AGA native Amiga graphics for WHDLoad games and of course the many Amiga demos I have


Never did understand why they chose "Best Available" instead of putting AGA under the Chip type in the Early startup menu Display options...anyway!


I used to have the PicassoIV in this system (which passes through Amiga native graphics output scan doubled plus it's modes via one VGA connector) so only one screen was needed, but having the 3dfx Voodoo3 PCI gives me higher resolutions in more colours.

It allows me to run AFA for AOS too which gives me anti-aliased fonts on the Workbench, a lovely AmigaOS4 theme, and png icon support too! :-)

The A4000T is the result of a lot of hard work over a lot of years to build up to this, and it is still a lot of fun to use in 2015! I don't think I could ever sell it!


Gotek Floppy Drive Emulator on Amiga 1000

$
0
0
After a prompt by someone on IRC this week I decided to try to get my Gotek Floppy Drive Emulator working on my recently purchased Amiga 1000.


As I suspected before I started with this little mini project - there would be some tricks to get it working on an Amiga 1000 due to the need for the Kickstart disk before anything else could happen.

As regular readers of my blog would probably remember, last year I bought the Gotek Floppy Drive emulator and tried it out on my Amiga 600. That blog entry is here if you want to review it first as I cover the functionality of the Gotek in much more detail than I will here.

So, can I get it to work in the Amiga 1000?

To start with, I took off the case, which marks the first time I have opened the Amiga 1000 since I got it. Once open I took a look at the case cover inside, and it does have all the signatures on it as I had seen in pictures elsewhere! I was glad to see it (All photos in this entry can be clicked to be expanded):


Closer view of the signatures:


Jay Miner's signature and his dog Mitchy paw print are there too, of course:


Looking at the Amiga 1000 internals, it has a big protective cover, much like the Amiga 1200 had when bought new. Just like that cover this one was also a pain to remove - lots of screws:


Eventually though I got the cover off, exposing the main Amiga 1000 motherboard:


Some close up shots of the chips on the motherboard:


The inside is surprisingly clean considering it's age - it is 30 years old! The next close up shows the 68000 CPU, floppy drive cable and power cable.


Before we can connect the Gotek Floppy Drive Emulator to the Amiga 1000 though I have had to do some things first. Namely, copy the Amiga 1000 specific Kickstart 1.3 disk (ADF format) and Workbench 1.3 Disk (ADF format) to the Gotek USB stick.

As discussed in my previous blog post on the Gotek, there is a selector.adf program on position 000 of the Gotek which enables you to select disks to assign to each slot on the Gotek. However, this selector.df needs the Kickstart to be loaded first on the Amiga 1000.

This means we need to assign the Kickstart 1.3 ADF on the Gotek using selector.adf to do that.

However, this is not possible to do on the Amiga 1000 itself because once I connect the Gotek and disconnect the floppy drive, there is no way to load the kickstart disk needed to then load the selector.ADF!!

Enter my trusty Amiga 600 to save the day. I connected the Gotek to it first so I could configure the Selector.adf on it to use the Kickstart 1.3 ADF in Slot 001, then save it:


In case you are curious, in this shot of the selector.df on the Amiga 600 there is also the external scan doubler I use on the Amiga 1000:


As you can see below I have now assigned Kickstart 1.3 ADF in Slot 001, ready:


With that now done, I can now unplug the Gotek from the Amiga 600 - I no longer need the Amiga 600. I then connect the Gotek to the Amiga 1000 floppy drive cable and power as below:


Another view of the connection:


I make sure Slot 001 is selected and power on the Amiga 1000:


It automatically boots the kickstart 1.3 ADF from the Gotek and the next prompt I see is the Workbench 1.3 insert disk screen - fantastic - it works!


I then selected Slot 002 on the Gotek to boot Workbench 1.3 ADF which works well also:


Exciting stuff. I reboot ready for the next test:


I run a classic Amiga demo ADF from a different slot (003) on the Gotek - Micro Concept by Crusaders - a great music disk:


Some more demo ADF tests followed - how fantastic not to have to use floppy disks any more on the Amiga 1000!


Having established the Gotek works great on the Amiga 1000, I next needed to work out a way to keep it connected and still have the option to go back to the original floppy drive if I ever want to.

I found a longer Amiga floppy drive cable I had spare and ran it from the internal Amiga 1000 floppy drive connector outside through the right hand expansion port. I then used an external molex power source (used for powering IDE/SATA hard disks for USB connection) and used a molex to floppy drive power connector splitter.

This means the internal floppy drive is no longer functional - but I can always reconnect it again if need be.

This external setup is not perfect I know, but does allow me to put the case back on the Amiga 1000 and keep things reasonably tidy - I have no intention of hacking up the case to make it fit inside:


After I put my 512k expansion card back into the right hand side expansion bay, I found it performs a useful role of keeping the Gotek in position on top of the Amiga 1000, and also stops it moving around when using the buttons on the front of it:


And here is the Amiga 1000 all reassembled again, with the Gotek running and having just booted the Kickstart 1.3 ADF again:


I think this is a great addition to the Amiga 1000 and it will stay in place from now on:


I also tested some games by changing the Slot to 000 to use the selector.df to assign some of the many games I have on the USB stick to various slots on the Gotek:


I then reboot and select the Slot I want using the buttons on the front of the Gotek - here is R-Type booted up from the Gotek:


Katakis works great too:


Having the Gotek on the Amiga 1000 makes great sense!

After trying it on the Amiga 600 last year I couldn't see a use for it given I had a hard disk and accelerators, etc. On the Amiga 1000 it fits well, and works great! Recommended!

AEROS 3.5 on ASUS K52F Laptop

$
0
0
Today I wanted to take a look at AEROS v3.5, an AROS (AROS Research Operating System) distribution released on x86 PC's.


AROS is an Open Source effort to realise AmigaOS on standard x86 laptops and desktops.

Late last year I took a look at Icaros Desktop 2.0 (AROS) running natively on an Acer AspireOne laptop (here and here). I also displayed AROS running on the Acer AspireOne at AmiWest 2014.

There are a few variants of AROS around, much like Linux also has many variants. One of these variants is AEROS, which used to be called AROS Broadway.

The broad concept of AEROS (from my understanding) is to accept that the driver support of AROS (currently quite limited) and is not going to improve quickly. It takes a shortcut by using Debian Linux as the base (or Host) for driver support and then run AROS on top of it.

Amikit also works on a similar concept from AmigaOS3.x, except with a much more cutdown version of linux, bootable from a USB stick on any x86 PC. (it needs a copy of Amiga Forever to get it up and running)

This type of hosted distribution has the benefit of being able to run AROS on more PC hardware, leveraging Linux's greater developer base and much larger driver support for modern PC hardware.

Currently AEROS is distributed as an operating system for ARES Computer (who sell software and systems running AROS). The developers are numerous and most are listed here.

There is a AEROS Plus (for registered users) and standard AEROS available for free to the public. AEROS Plus is the latest version of AEROS, whilst the free version is a few versions behind the latest version.

The current free version of AEROS is version 3.5, which was released in 2013 and is available to download here as a torrent only - it quite large at 2.88GB. You will need a BitTorrent client to download it on a PC or Mac - I use Vuze on the Mac, but there are plenty of torrent clients out there!

It is this free 3.5 version of AEROS I will take a look at today.

For my testing I brought out my Asus K52F laptop, which is a pretty bog standard PC laptop. I use it to test new Linux distributions since all the hardware normally works with them - most recently I was testing ElementaryOS on it (which is very nice, btw).

The AEROS package is delivered as a DVD iso, which you will need to burn to DVD-R before you can start the installation. The DVD is bootable Live DVD, so you can test it without installing it on your system if you prefer.

Once you put in the DVD and it starts to boot, you get the initial Boot Screen:


The boot screen gives you the option to Boot into the Live DVD environment, the failsafe environment, test the memory in the system, or boot from the hard disk in the system:


I choose to boot into the Live environment, and after some time the AEROS Workbench appears (you can click to expand any of these photos):


A close up view of the Workbench reveals an InstallAEROS icon to install the AEROS system to your hard disk, which is what I want to do:


I can see that in this version Wanderer is still the default Workbench GUI, rather than DOpus 5.9 used in the newer Icaros Desktop 2.0:


So next I double click on the InstallAEROS icon to get started with the installation - almost straight away it warns me that "This is an advanced installer. Please use with caution" and confirms if I want to continue:


Next it warns me that I need to set up one install partition and one swap partition for the installation - the installer uses GParted for this:


Accordingly I then select the hard disk controller on my system - easy since there is only one!


Next I get the familiar GParted partition window from Linux. Because I had ElementaryOS installed on this laptop before, it already automatically created the partition map for me (as part of that install). So all I need to do here is to format the install partition:


Regrettably it seems that if you need help with the use of GParted you are on your own with Google, as the normal help guide in GParted appears to not be included in the package. I think it should be included as there is plenty of room on the DVD:


In any case, I reformatted the Install partition /dev/sda1 as ext4 format, as shown below:


The disk format commences once I click on Apply button in GParted:


Format done:


And here we are, ready to go:


When I close GParted the install continues - it asks me to select the install partition and the swap partition:


It then asks me for the filesystem type for the install partition - looks like I didn't need to format the partition myself after all!


It then asks where to install /home to - there is only one option since I only created one install partition:


Username and password information is collected next - this installation really is a typical Linux installer, which makes sense since it is Linux after all:


The installer then asks me for the hostname (Computer name):


Linux uses Grub to boot itself when you turn the computer on, so it wants to know where to put it. Since I only run AEROS on this system, I select the mbr (Master Boot Record). If you run multiple OS keep in mind that you will need to edit the Grub config to dual/triple boot if you desire it:


Asks me next about date/time being correct on the local computer and choose my location:


In a flashback to old school Red Hat Linux, I then get a terminal screen asking me to select which Locales to install...this part is not very user friendly, requiring arrow keys, space bar to select and tab key to navigate to the OK button to continue (no mouse input):


It then asks which Locale I want to be default - I choose EN_AU.UTF-8:


After the locales are installed, you get a final confirmation box that everything you entered is ok and you are ready to proceed. It would be nice to see a summary of what you did actually select since I certainly don't remember it all!


The installation to hard disk now proceeds:


Eventually the installation completes - this process took about 40-50 minutes in total (as a guide) - ready to reboot:


On reboot you get a reminder that AEROS is based on Linux (Debian), with the Grub boot menu showing Debian GNU/Linux boot option - shame you don't get the same AresOne Computer boot screen from the Live DVD:


When it finishes booting up you get the AEROS login screen - enter the username and password you entered from the installation process:


The AEROS Workbench then appears, looking the same as from the Live DVD:


At the bottom of the screen is a Application switcher which pops up when the mouse hovers at the bottom:


On the bottom right of the screen is an ARES Computer icon which is the QLaunch bar. When clicked it expands to show a number of icons which hide further submenus to select applications to launch:


You can change it to expand up, rather than across if you prefer in the Prefs section.

In the submenus I found a screenshot program, which allows me to take some nicer screen grabs from this point onwards, although it does have some issues - principally I can't find a way to make it disappear when screenshoting, forcing me to crop the right hand side or leave it in the shots...judging from other people's web screenshots they also hit the same problem.

The main QLaunch bar has the following icons - Power Off, Reboot, OtherOS (Emulators), SimpleMail, Internet (OWB), Chat, Classic (FS-UAE Emulation), Games, My Apps, Places (Documents, Music, Pictures, etc), Tools, Linux (programs), Prefs (Wanderer, Themes, and so on):


Here is a example of the submenus in the QLaunch bar in AEROS - here showing the OtherOS > Vice C64 icon shortcut:


It is also evident the mixture of Linux applications and AROS ones on the AEROS Workbench itself, with some common Linux applications (Chromium, FS-UAE, GIMP, WIFI config) able to launch from the AEROS Workbench on the same screen as the AROS applications.


Below is some AROS applications running on AEROS - HivelyTracker, DOpus 4 and a Shell (in the background):


Typical Drawer layout in AEROS - here showing the System: drive - you can use the back arrow to navigate back a drawer as you navigate through the drawers and can type into the address bar manually and Press Enter to navigate to a specific location:


Another view of the AEROS Workbench, this time showing the Hollywood based snapshot program on the right:


Here is the AROS Shell:


I took a look at some of the applications included with AEROS next.

OWB (Web Browser):


Thumbnail Image previewer:


SimpleMail:


A closer look at HivelyTracker:


I gave AROS MPlayer a go too - interesting thing I found is that when you insert a USB stick, the Linux side mounts the device and it pops up on a Linux window. If I close that and open the Removable Device icon on the AEROS Workbench, I can then access the USB stick contents from within AEROS - nice. 


I then put my terrible graphic design skills to the test in LunaPaint:


Janus-UAE and FS-UAE (with extra Amiga Forever files needing to be copied from their DVD first) are also available to emulate Classic Amiga systems to run old Amiga programs and games on AEROS - I didn't play around with this yet but I expect it would work similar to how it does on Icaros Desktop:


In AEROS, NoWinED is the editor included:


Next up I decided to try the AROS Vice C64 emulator, trying out a demo that was included with it that ran ok:


The MAME emulator:


Next I tried running a few AROS games, like 1941 Deluxe 1.0 (HunoPPC) and Open Tyrian, both included in the AEROS installation:


I also tried out ScummVM, running the included game Beneath a Steel Sky, which runs well:


AMC (Media Center software like XBMC on Windows/Linux/Mac) is also installed, albeit in demo mode - it needs to be purchased from ARES Computer here to unlock all of it's functionality.

I couldn't work out how to snapshot programs like AMC running on a separate screen to the AEROS Workbench screen (or linux applications running side by side with AROS) so I had to bring out the iPhone again, sorry:


The next two screenshots show Linux applications running side by side with AROS programs:


Linux application GIMP running in AEROS:


AEROS is certainly an interesting concept, trying to play to the strengths of Linux to make up some of the areas where AROS needs help, especially driver support and some common modern applications like GIMP, OpenOffice, Chromium, etc.

I was concerned that AROS would lose it's identity by hosting it on top of Linux, which it does not seem to do with AEROS v3.5.

That said, there is certainly room for improvement - AROS has always been a bit buggy (this is not AEROS specific) and several applications crashed on opening or while I was trying features out.


Fortunately by being hosted, rebooting the AROS environment within AEROS is very fast indeed as an actual reboot is not needed normally.

I wanted to play around with the themes to show the Icaros, MorphOS and AmigaOS style themes available. But I couldn't change Themes when I tried this out in AEROS - it kept asking me to insert the Theme: volume for some reason - here are the theme previews anyway:


I think AEROS would benefit from using a newer Linux build (probably the newer AEROS versions requiring registration do - but I haven't tried these yet).

A much simple install process would be also very welcome as it is a bit overwhelming if you have never installed Linux before. I have tried to show what you can expect and how to do the installation process for AEROS.


I will continue to follow with interest developments in AEROS and AROS too - hopefully it will continue to evolve and get better and better!


Swamp Defense 2 for AmigaOS 4.1 on X1000

$
0
0
Today I wanted to take a look at the recently released Swamp Defense 2, released on AmigaOS4.1 on my AmigaOne X1000.


Swamp Defense 2 is by Entwickler-X, the team behind the original Swamp Defense (which I reviewed in 2012 here), and countless other games for AmigaOS 4.1 in recent years.

A demo of the game is available to download from their website here, and the full game costs EUR16.99 and can be purchased for immediate download from their website.

Alternatively, you can also purchase Swamp Defense 2 on AmiStore for GBP10 for immediate download as below (click any photos in this post to enlarge):


You can also soon buy a physical boxed version with CD and manual from various Amiga dealers too!

I decided to purchase it from AMIStore on my X1000.

BTW if you haven't installed/used AMIStore yet, it is an App Store for AmigaOS 4.1 released in November 2014. I covered AMIStore in some detail here and here if you want to check out more about it.

Once purchased in AMIStore, I started downloading Swamp Defense 2 from my purchased items:


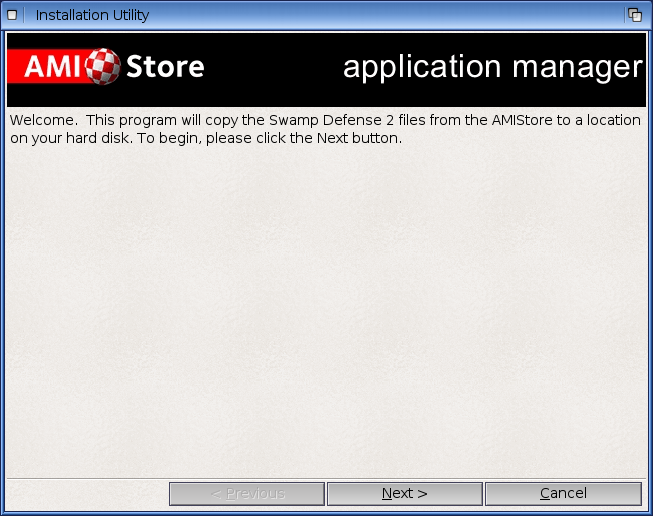
When download is completed, the installer then starts automatically:


Choose where you want to install the game:


Installation of files happens quickly:


And we are done!


Now I have the Swamp Defense 2 drawer with the following icons in it:


I run the Config program first to check out the options available:


From the Config program I can change the game to run in full screen or a window, and the screen aspect ratio, Sound card AHI selection, amongst others. I chose to run it in full screen 1920x1080 with 16:10 aspect ratio, and clicked on Save.

When I run Swamp Defense 2 itself, it initially comes up with the AmiBoing online profile login, which allows your progress and high scores to be submitted to an online global highscore table.


Once logged in, the main title screen shortly appears:


The Question Mark option allows you to see a quick guide on how to play Swamp Defense 2.


In summary the game is similar in gameplay to it's predecessor Swamp Defense in that it is 2D and viewed from above. It consists of a series of maps you need to complete, now divided into mulltiple zones, each with a number of maps to complete. This is very much like the popular game Angry Birds in zone concept. 

Each level has one clear route (generally left of screen to right of screen but does vary) which a number of different aliens take in separate waves. The route changes with each level. You need to stop the aliens from reaching the end of the route, which require you to place various people with different levels of weapons at key points along the route to shoot them. You can also attack with other weapons (new to Swamp Defense 2) that can be purchased with in-game money earned as you play the game.


You clear the first level when you have cleared 10 waves of aliens. The next level is 20 waves, and the difficulty of killing the aliens and the map strategy changes each time, providing quite a challenge.

You get money for each alien you kill, which can then be used to add additional people or upgrade the weapons people can use, depending on what kind of person they are. 


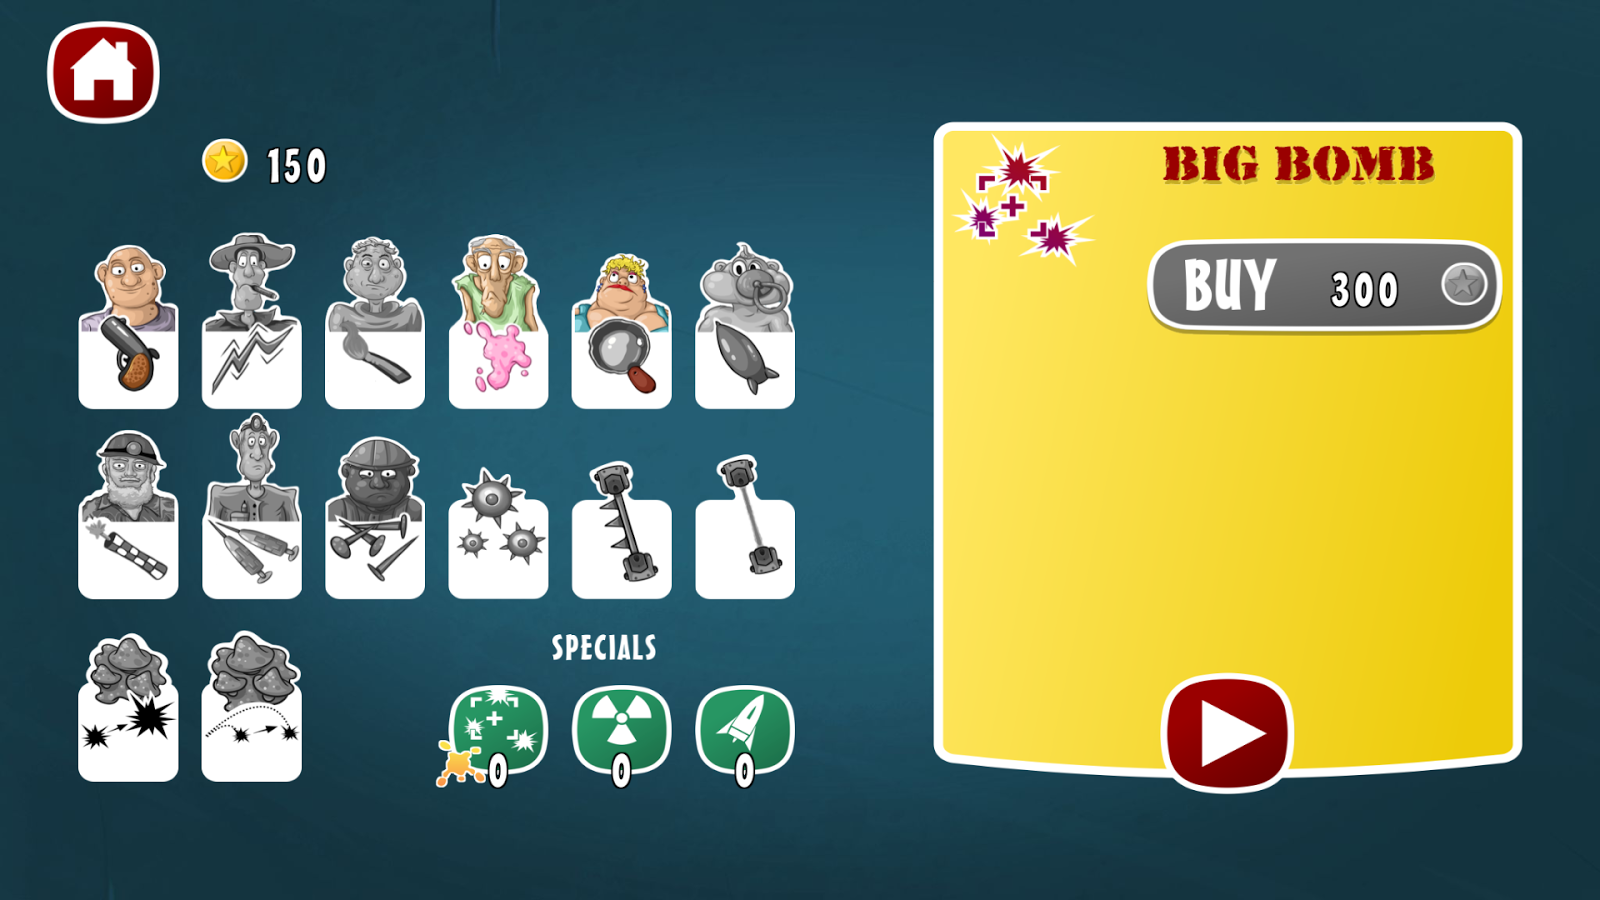
From the Main Title screen you can click the Shop icon to see what People and weapons can be purchased with your money:


As you can see, the upgrades have been enhanced substantially here for Swamp Defense 2, with the addition of extra bombs and weapons you can use during the game, in addition to the familiar people (called Towers in the game) from the original Swamp Defense:
.
Much like with Angry Birds, Swamp Defense 2 includes a Star earning system, that allows you to get extras along the way. Clicking on the Star icon on the Title screen allows you to see your progress to date:


For those all important bragging rights, you can also click on the Podium icon on the title screen to see how you rate compared to the global competition!


When you start the main game from the Title screen, you are presented with a map, which shows your current zone progress and which level is next to conquer - initially we are in The Swamp zone - if we have money we can click on the Shop icon to purchase weaponry and upgrades before we attempt another level:


You can see I have already attempted this first level and completed it successfully. It also shows the stars earned, and the option to select Normal or Hard mode (Hard mode needs to be unlocked - here it is). You can only attempt levels that are green, the others are locked and cannot be played until you complete the previous level that then unlocks the next one.

So let's see if I can do any better this time on the first level! As the game begins, I position two people, one that slows down the aliens by shooting them with some kind of pink glue, and two shooters.


Positioning of people along the route is crucial to how successful the kills are. People have a certain range that they can fire at the aliens and no further. For example, locating people inside a turn where they can twice at the aliens delivers better results than people positioned on the outside of a straight piece of the route where they can only fire once.


As each wave of aliens comes through, we get more money to afford to buy more people to defend the route. This can be done while the aliens are progressing through the level, allowing you to add extra firepower downstream if you find that you are not able to get all the aliens before they pass your last line of defence!


To position people, click on a valid location on the level next to the main route. Certain positions are not allowed - eg. in the swamp itself, on the far left and right of the map and where obstacles have been placed. When a valid location is selected, the people available to be purchased for the position then appear - the others are greyed out:


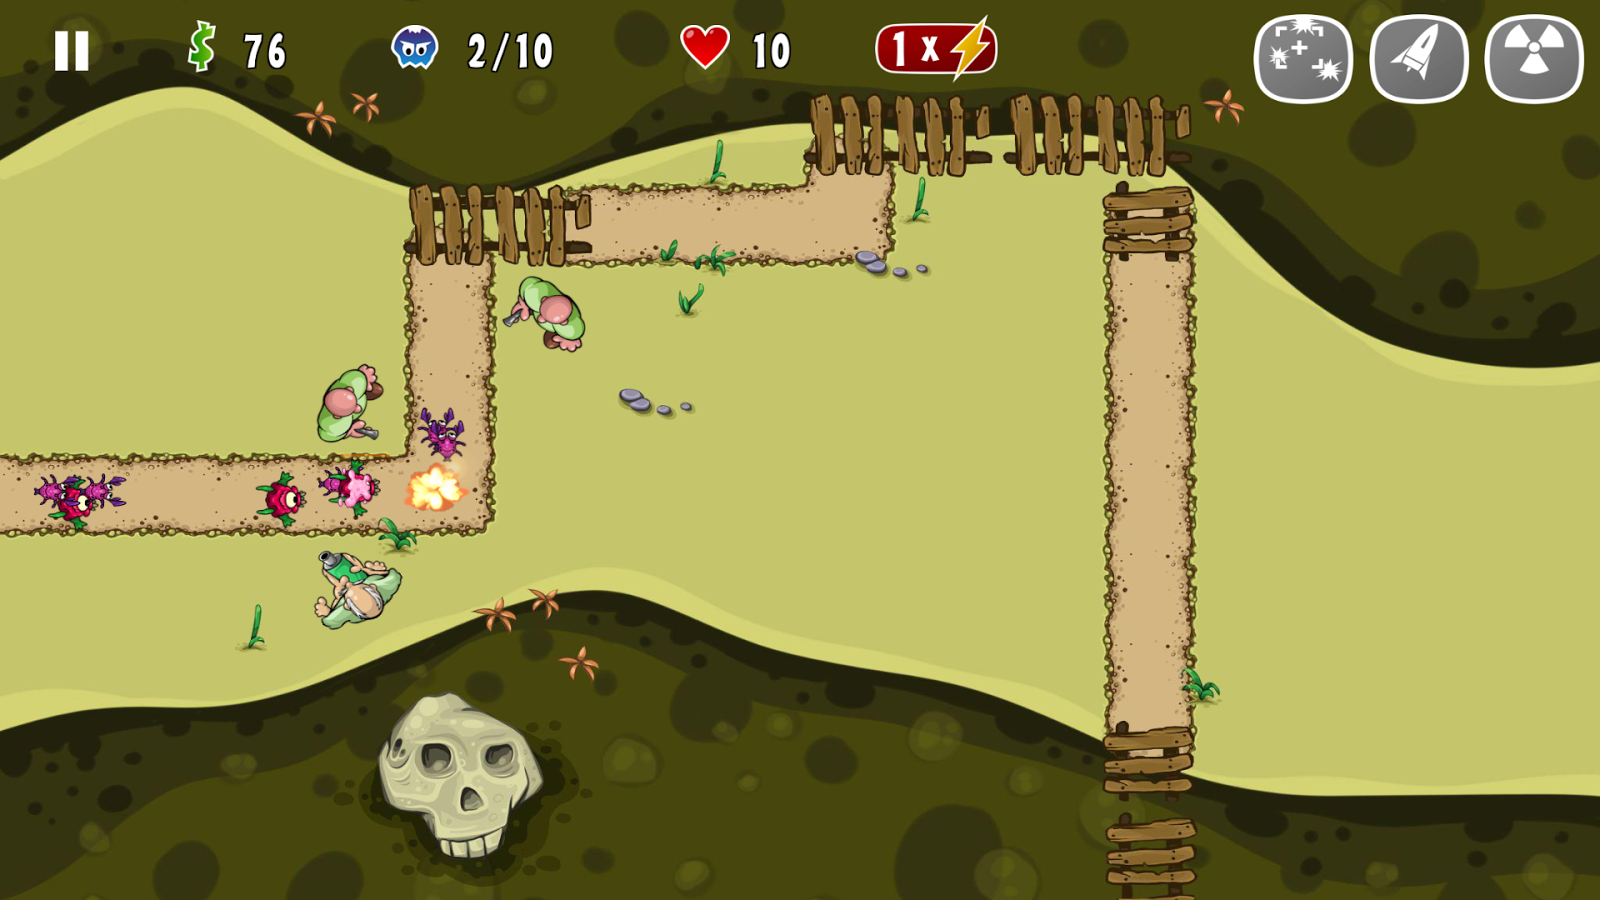
As this point I have made it through 7 waves of aliens of the 10 waves required to pass through this level. You can click on the 1x lightning icon on the top of the screen to speed up the wave advance so you can't move through the levels quicker (useful if you have everything positioned and don't need to add anything):


You can also upgrade the weaponry or remove a person from their position on the level during the game. By clicking on the person you get these options. You get a partial money credit that helps to buy another person. This tactic is useful when you want to replace a low end killer with a higher level one but have no spaces left to put them in on the level:


You have 10 lives to start with - every time an alien makes it to the end of the route you lose a life. The game ends when you have no more lives left:


My game is going well and I have reached the 9th wave on the first level now:


Last wave and the last alien is proving rather tricky to kill:


I didn't manage to kill the last alien, but only lost one life to complete the first level:


As the game progresses, it gets a lot harder - here I attempt the fourth level, a level I am still stuck on! This level has 20 waves, and my best attempt so far got my to Wave 17 - as you can see the Hard mode for this level is locked still:


This level is tricky as there are much less spaces to position your people initially (lots of positions that can't be used), and some of the enemies seem almost impossible to kill as the waves move on!


As normal I position my people for best effect in the level:


I could really use some of the extra weaponry but having trouble getting the cash needed!


Unfortunately things are not going well - starting to let too many aliens through:


When your lives get down to 2, it starts to pulse with a plus symbol in it - I believe it is possible to add extra lives if you have enough stars and money to buy it, but I don't regrettably!


The game over screen comes often, but this is definitely one addictive game - you can see the extra weaponry icons on the top right of the screen in this shot as I still have some left at this stage:


I can strongly recommend Swamp Defense 2 - the music and graphics are excellent, and the new features added into this sequel make it considerably better than the original game in my opinion!

The online scoreboard and addictive gameplay complete the package and definitely makes Swamp Defense 2 a worthwhile purchase!

It is really great to see new games for AmigaOS 4.1 in 2015!

Looking forward to even more games - but in the meantime, back to try level 4 again! :-)

AmigaOS 4.1 FE Classic on FS-UAE 2.5.29

$
0
0
Today I decided to install my AmigaOS 4.1 Final Edition Classic onto FS-UAE running on my MacOS X Yosemite (10.10) Macbook Pro.
Last year I setup AmigaOS4.1.6 Classic on FS-UAE on MacOS X Yosemite for AmiWest 2014. 

With the release of the new Final Edition Classic version and the considerable updates to FS-UAE since then I thought it was a good time to get AmigaOS4.1 Final Edition Classic installed and running under emulation on my MacBook Pro. (which for reference is a Core i7 2.6 Ghz Late 2013 model with 16GB memory, Nvidia Geforce GT750M 2GB, and 1TB SSD)

I followed the procedures outlined on EAB's FS-UAE support forum thread here on how to install AmigaOS4.1 on FS-UAE. This is a very good guide indeed!

Some changes since I installed AmigaOS4.1 Classic on FS-UAE last year include several major upgrades to the WinUAE base build used for FS-UAE, the support of VHD (resizable) virtual hard disks, SFS0 hard disk partition support (enabling SFS0 hard disk installs to larger HD sizes), Tocatta Sound card support and more too!

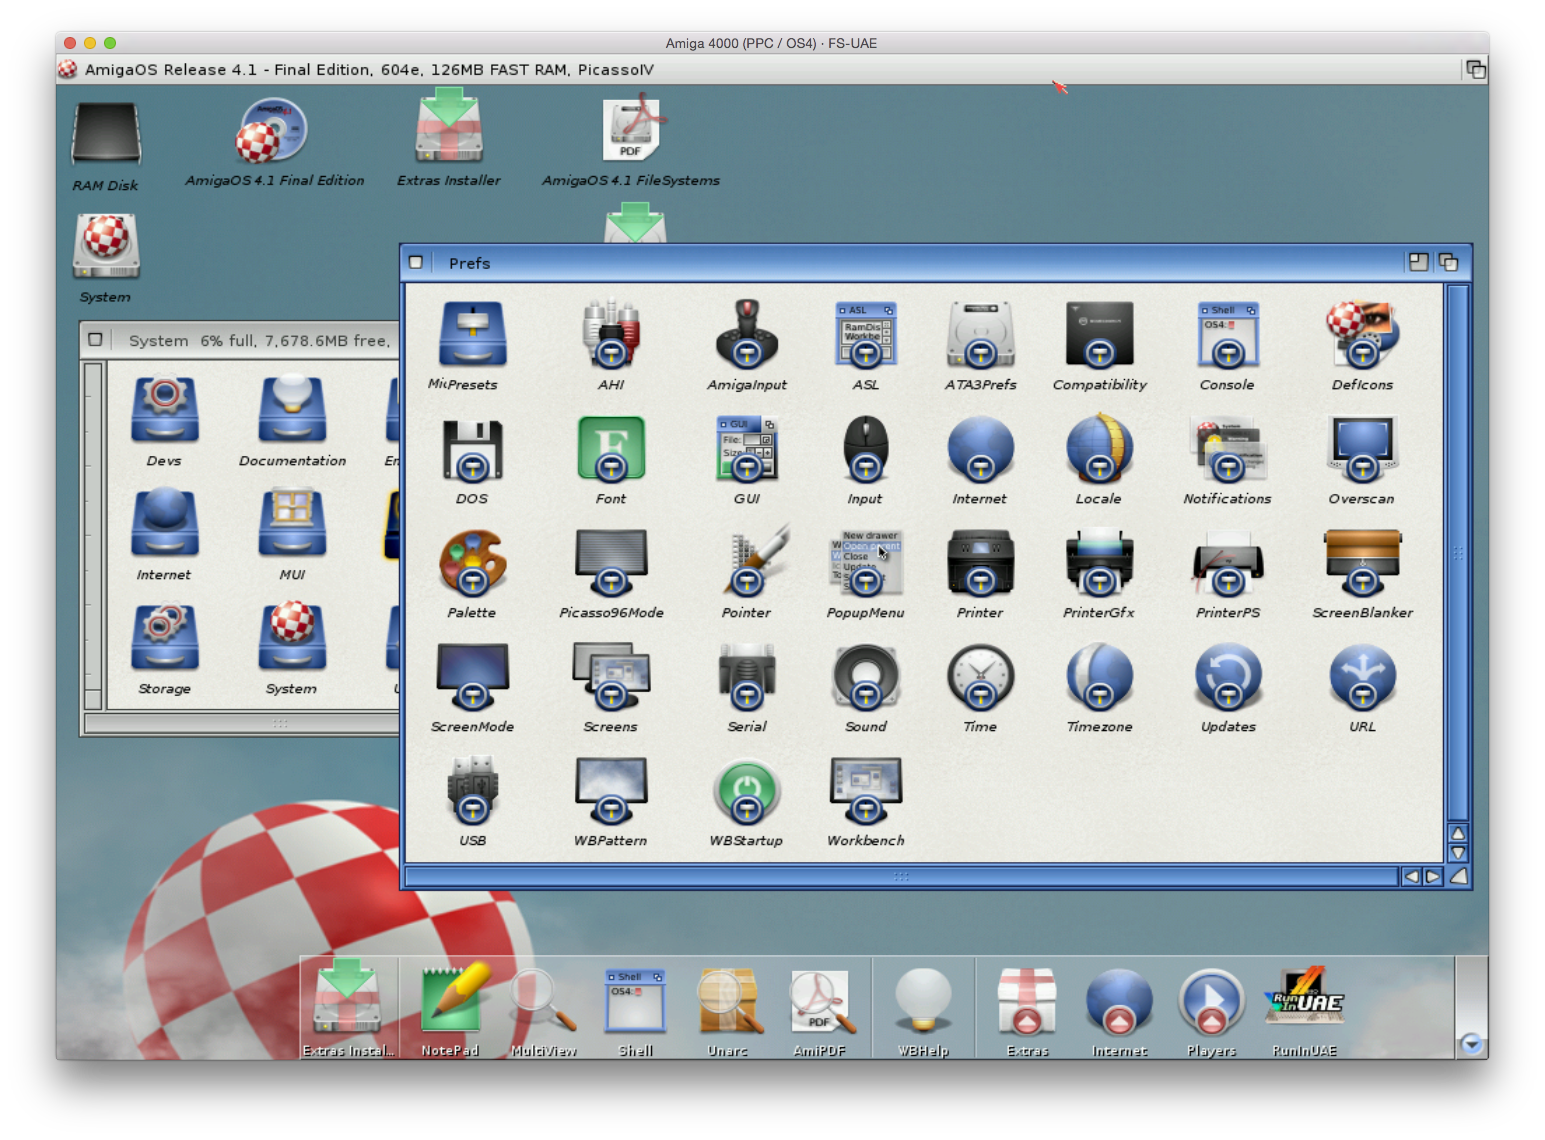
Another change is the update of the QEMU PPC plugin to the latest 3.6 version here (at the time of writing) to use the latest development build of FS-UAE 2.5.29dev, available from here for Mac OS X.

Another new tool in Mac OS X is the VHD Creator tool that can be used to create hard disks that grow as data is put into them, rather than consuming all the space allocated straight away. You can download this VHD Creator tool from here. Once downloaded you get this program to create the VHD virtual hard disks needed for the AmigaOS 4.1 Final Edition Classic installation.


So let's get started with creating an AmigaOS 4.1 Final Edition Classic setup using FS-UAE on Mac OS X Yosemite!

I will assume you have downloaded and run FS-UAE Launcher for MacOS X (you need to run it once to create the FS-UAE folder structure under Documents).

I also assume you have the QEmu 3.6 plugin and have put the legal Amiga Forever CD kickstart ROMS, Picasso IV ROM and Cyberstorm PPC ROM file into the correct places in the Documents/FS-UAE/Kickstarts folder.

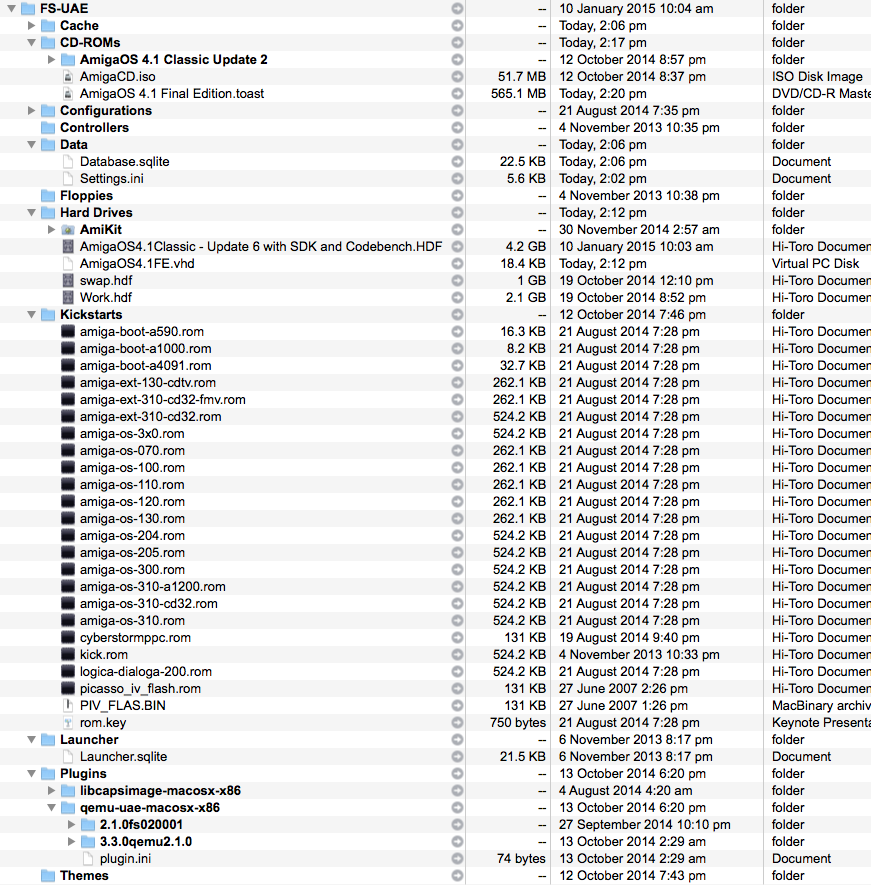
As a reference my Documents/FS-UAE folder structure looks like this (before I put the latest QEmu 3.6 into the Plugins folder):


I then copy the latest QEmu PPC 3.6 plugin to the FS-UAE/Plugins folder, and archiving the old versions under a new sub-folder I called Older Version:


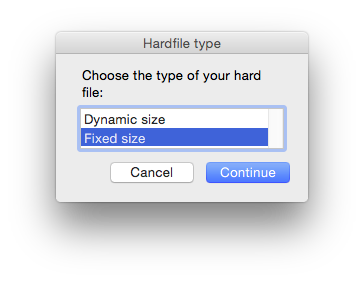
I used VHD Creator to create the virtual hard disk. when I run VHD Creator it prompts to specify whether you want a fixed size or dynamic:
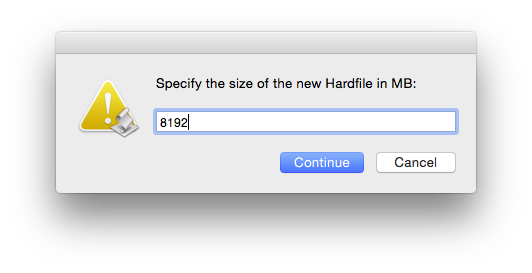
Next, it asks how large you want the disk to be. If you were planning to format the disk as FastFileSystem (FFS) then 2048 is the correct value here. In my case, I am planning to use Smart FileSystem (SFS0), which allows me to specify a much larger disk - I chose 8192MB (8GB):
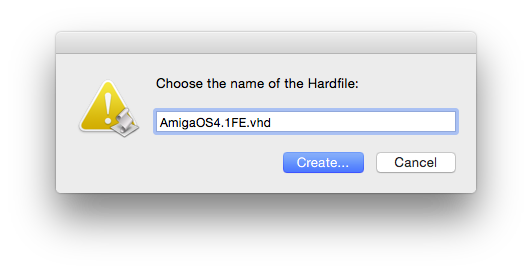
VHD Creator then asks for the name of the hard disk file - I called it AmigaOS4.1FE.vhd, and after that you press Create...
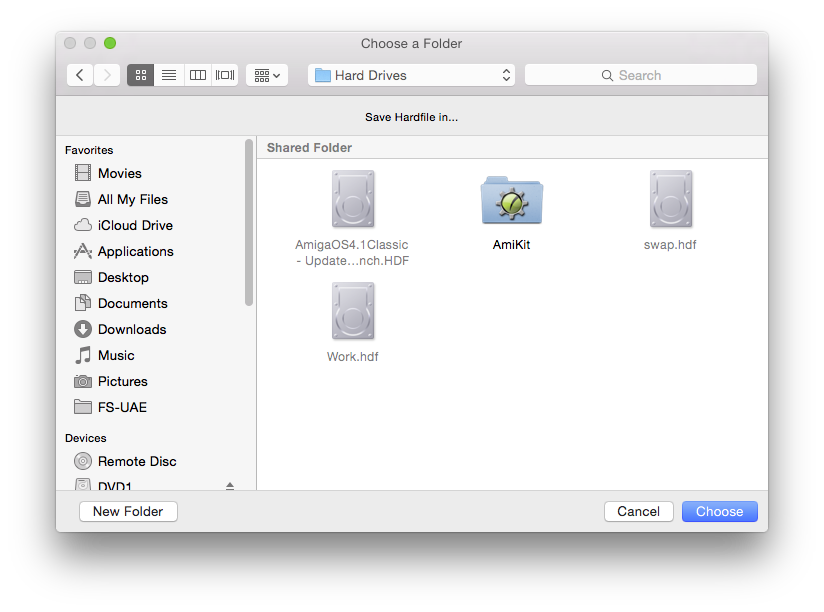
It then asks where you want to save it - make sure you save it in the Documents/FS-UAE/Hard Drives path:
After this step the program closes and the VHD hardfile is ready to be formatted inside the emulation later on...

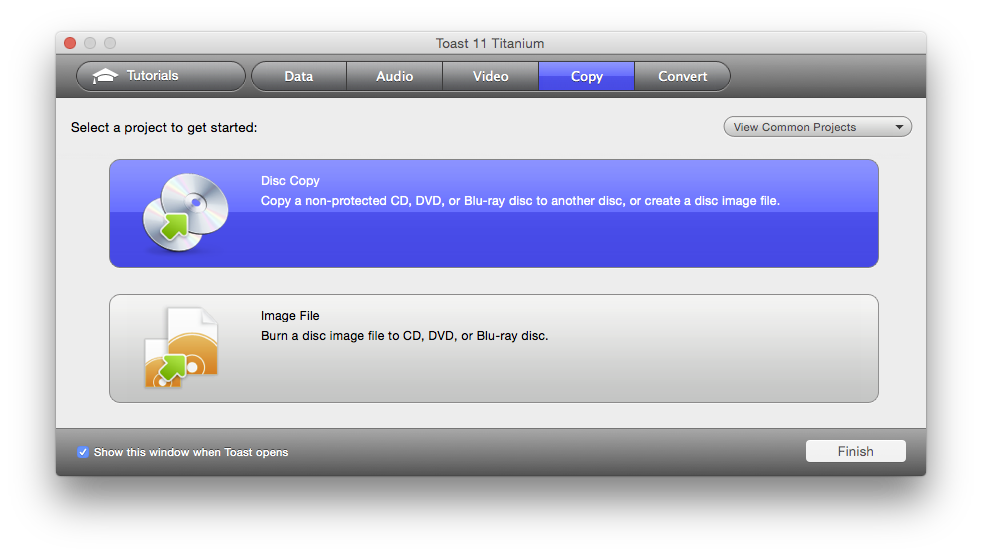
Next we need to create an image (iso) of our AmigaOS4.1 Final Edition Classic CD, to be able to mount it in  FS-UAE. I used Toast 11 for this, but you can use whatever your favourite image creation program is on Mac OS X. Select the Disc Copy function.


Make sure to select Disc Image as the destination (select from the drop down list):


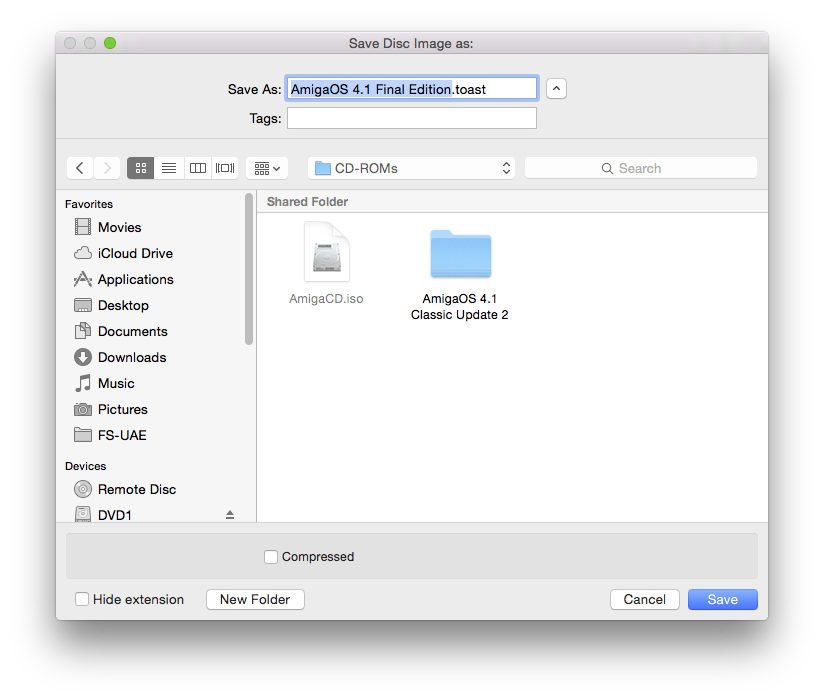
Once created it will prompt to save the .toast image file somewhere - be sure to save it to Documents/FS-UAE/CD-ROMS - I called the file AmigaOS 4.1 Final Edition.toast:

Then from the Finder (I use Pathfinder as a superior Finder replacement) you need to rename the Disc image from .toast to .iso.


That done, now run FS-UAE 2.5.29 Launcher and we can start to configure.

In my case I have some configurations from previous setups - click on the New configuration icon (shown below next to where it says AmigaOS 4.1 Final Edition) to create a new configuration, and title it AmigaOS 4.1 Final Edition (or whatever you want to call it) - select Amiga 4000 (PPC/OS4) as the Amiga Model:

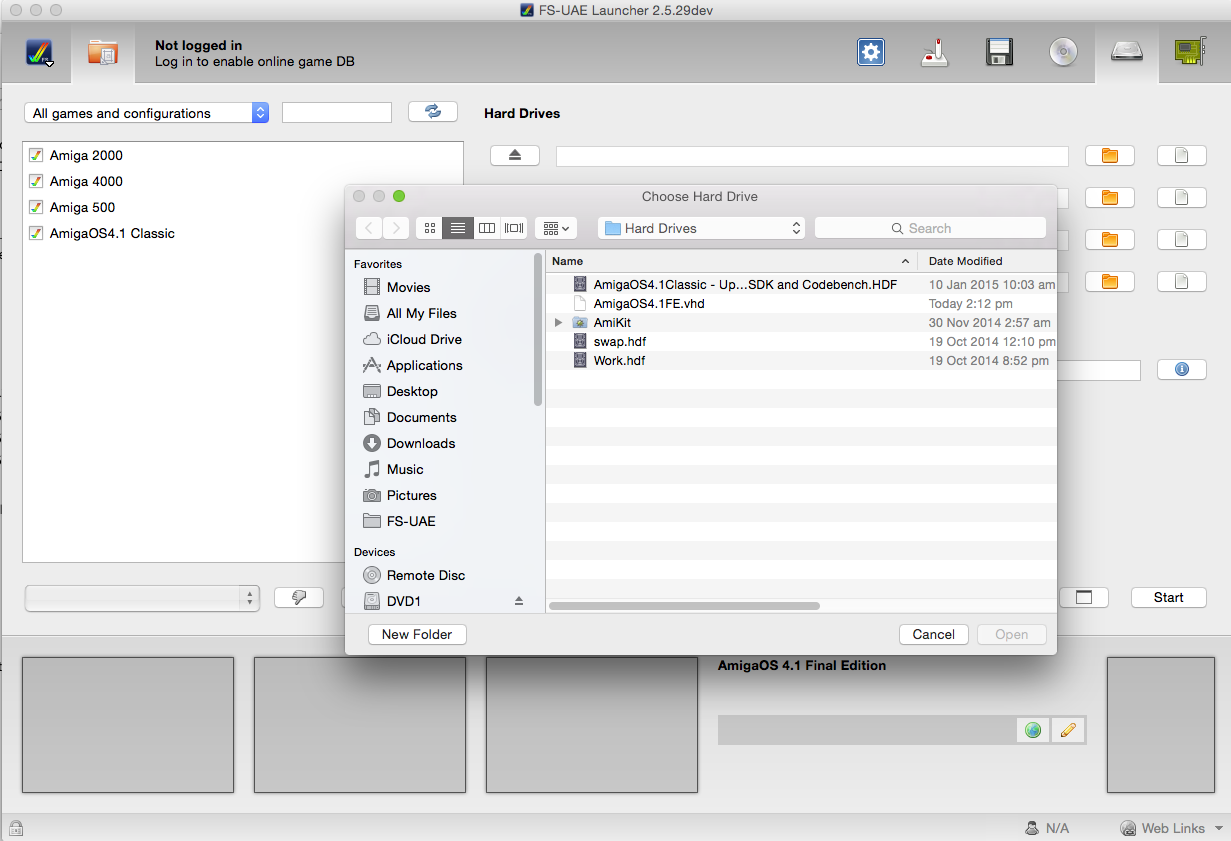
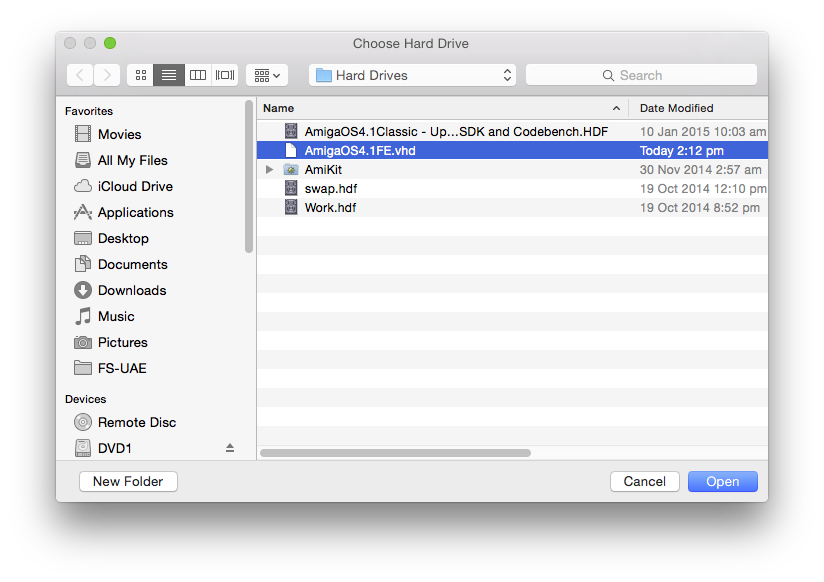
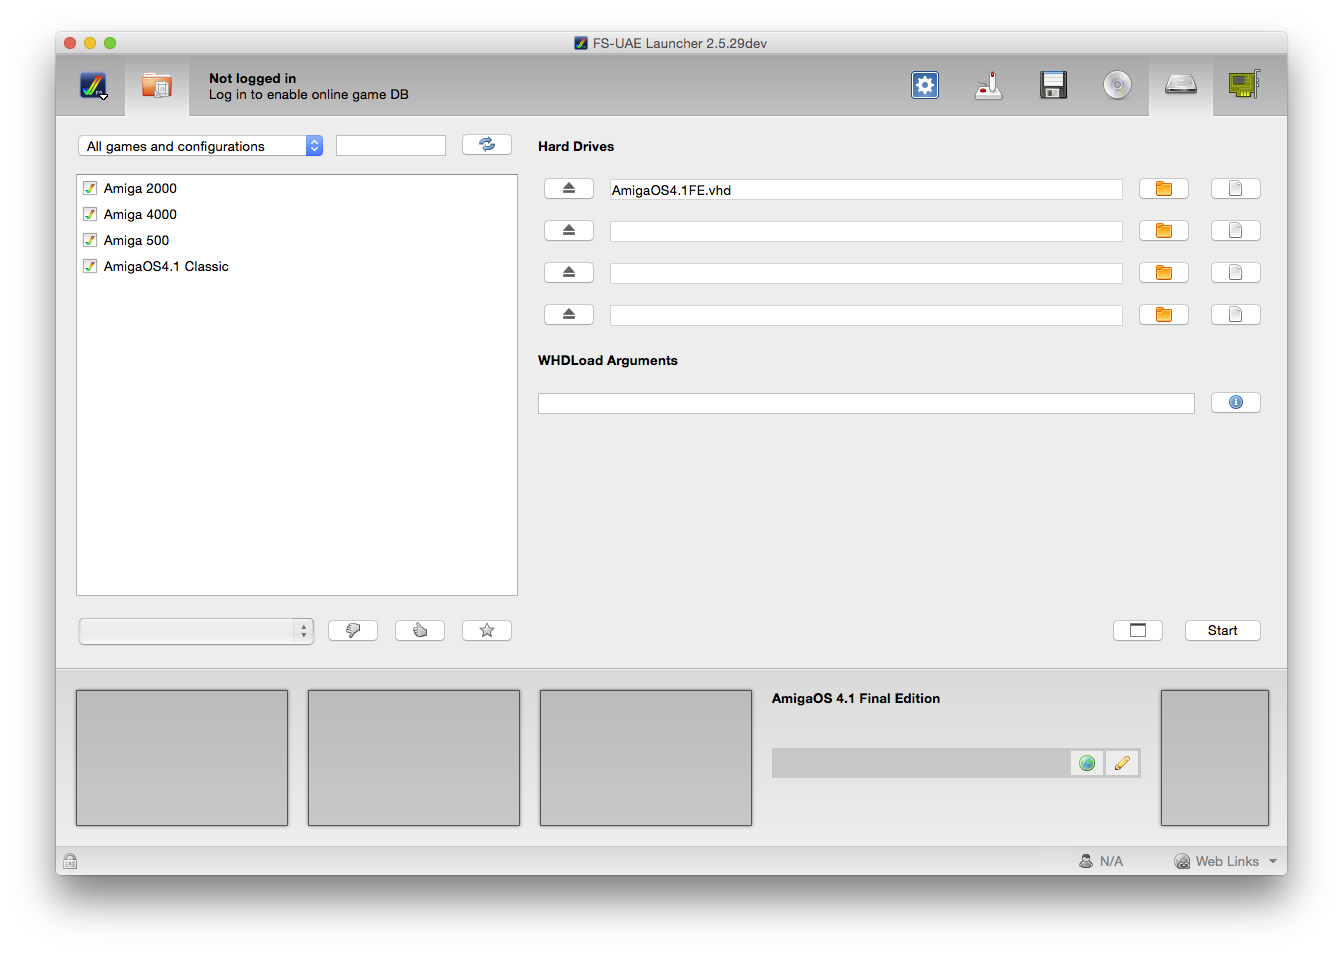
Click on the Hard disk icon to configure the hard disks. Add in the AmigaOS4.1FE.vhd we created earlier:


The hard disk is now added:

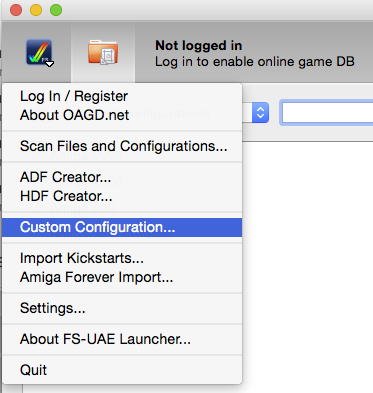
Next we go to the FS Amiga logo in the top left and select Custom Configuration... from the menu:


Then add in some lines to set the type of the hard disk to rdb, and optionally you can specify the location of the cdrom and hard disk here too (click to expand any of the pictures):

Then click on Close to close the window.

I went into the CD icon tab and added some additional iso's I created from the previous AmigaOS4.1 classic install from last year that contain some utilities and programs I want to install once the installation of AmigaOS4.1 Final Edition is done. You need to add these iso files to the CD-ROMS folder in FS-UAE to have them visible immediately when adding them in here:

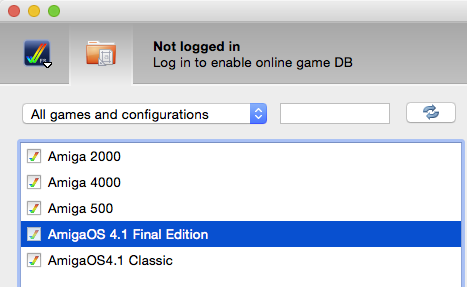
Now I clicked on the Save button (next to the AmigaOS 4.1 Final Edition configuration title) to save the configuration (it shows a red arrow when you have made changes that have not been saved yet).


It will then  appear as selectable on the left hand pane:
 

 Now we are ready to launch the emulation - Click on Start to get underway - you can use the window/full screen button next to it to change if it runs in full screen or window mode:

Initially the CDROM will not boot in FS-UAE and you will get the Insert disk screen:


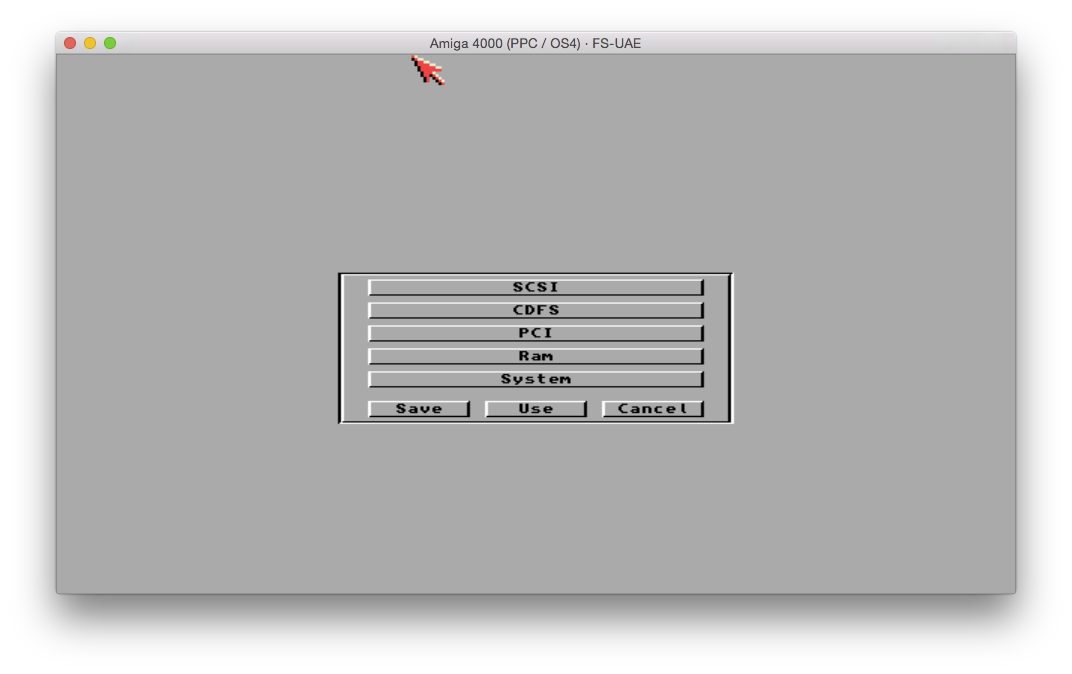
Use Function + F12 (if using a mac keyboard) to bring up the Emulator control menu as above, and select Reset Amiga > Soft Reset. Immediately press the ESC key to get the Cyberstorm PPC menu as below:
Select the SCSI button, then double click on the Unit 1 entry in the scsi device list as below:
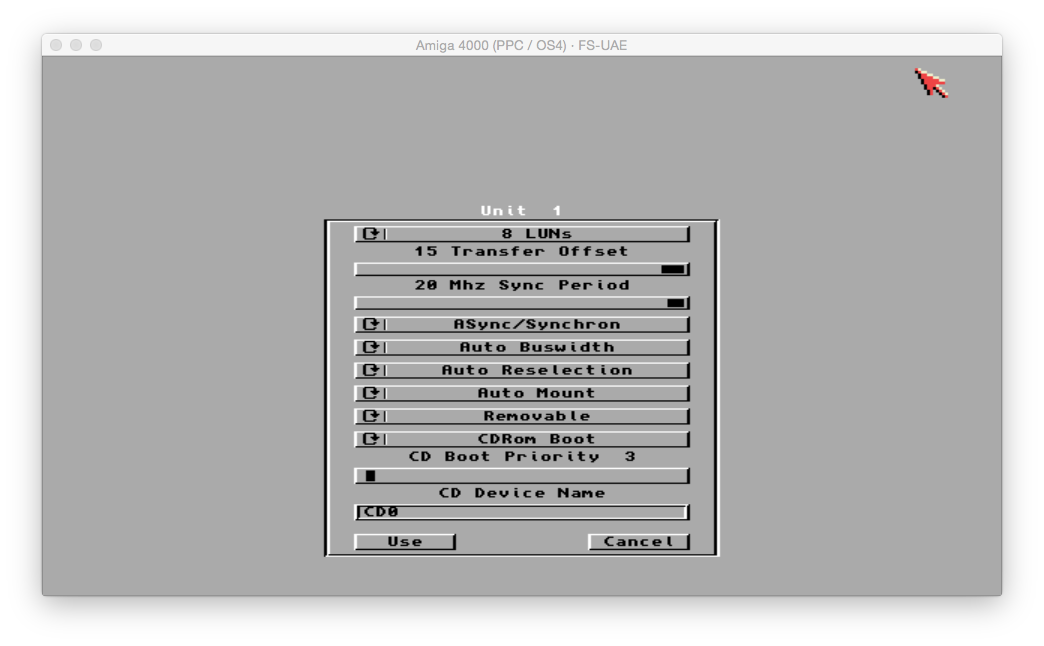
The Unit 1 settings then appear as below:
We need to change the settings so the device can boot and is removable (rather than Auto-removable). Change the settings to what is shown below and click on Use:
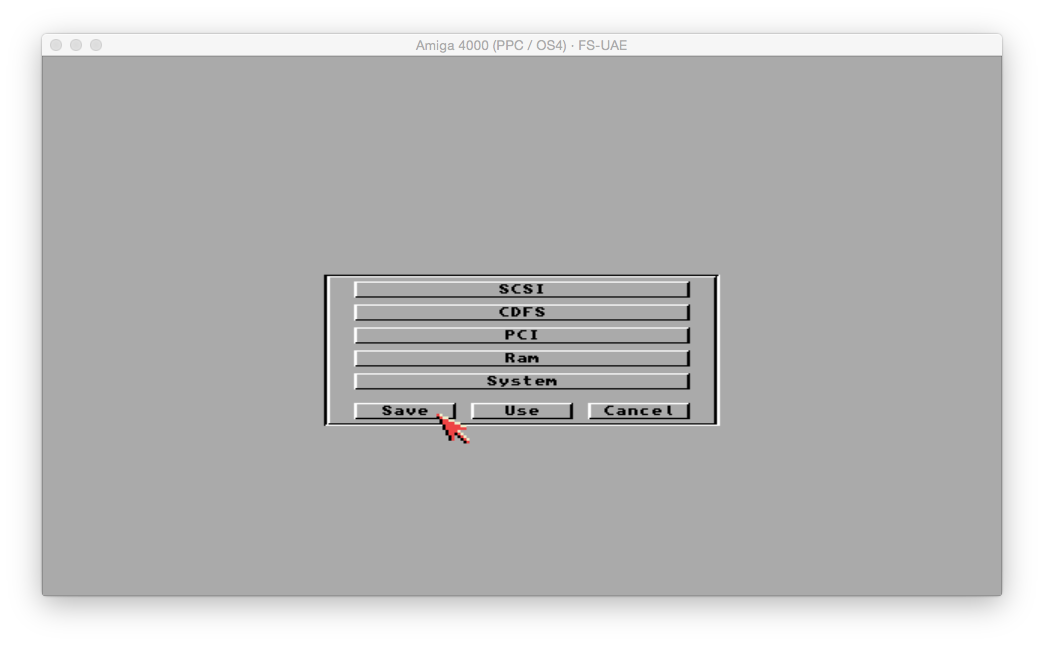
Then click on Save to save the configuration:

The FS-UAE emulation should then boot from the AmigaOS 4.1 Final Edition Classic iso as below:
It will then reboot, all going well initialise the PowerPC plugin and then boot the CD into AmigaOS4.1 Final Edition:

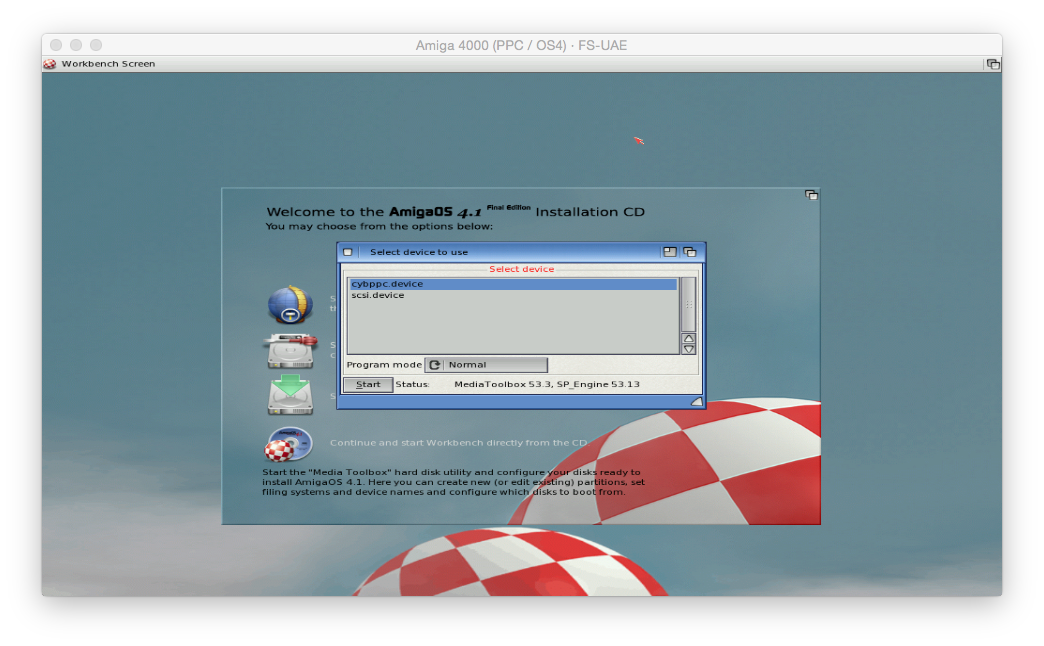
Shortly after we get the initial Live CD installation screen:

First step here is to start the Hard disk Preparation utility option - select the cybppc.device in the window that comes up and then select Start:


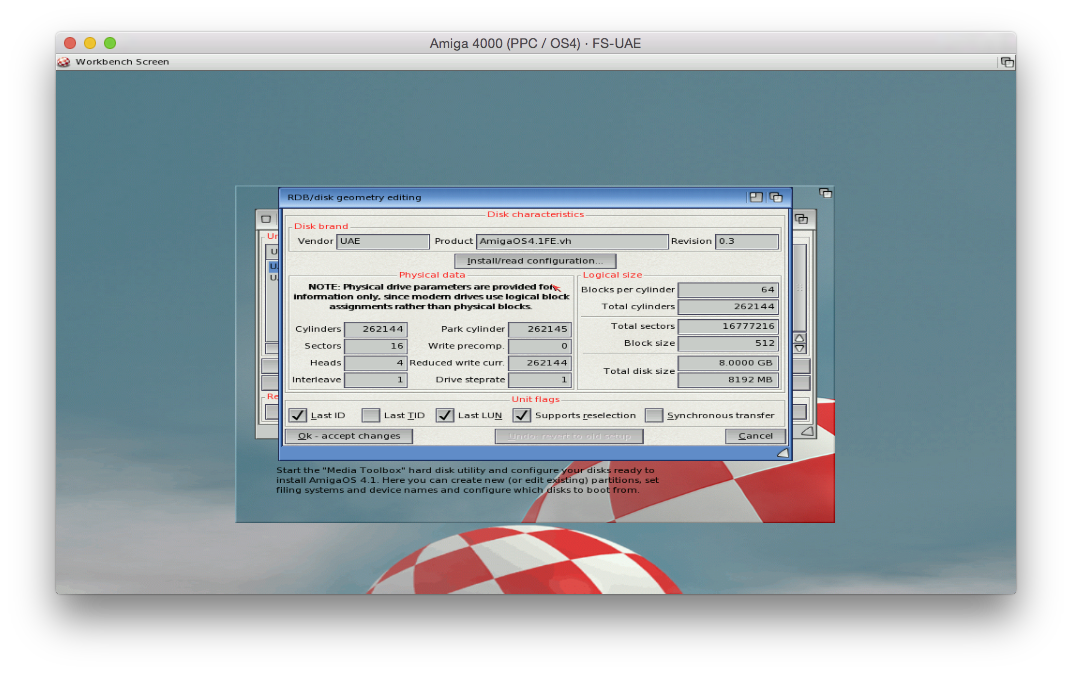
It should prompt to initialise the hard disk and give you a screen similar to below - make sure the Total Disk Size field matches what you specified in VHD Creator tool and then click on OK - accept changes:

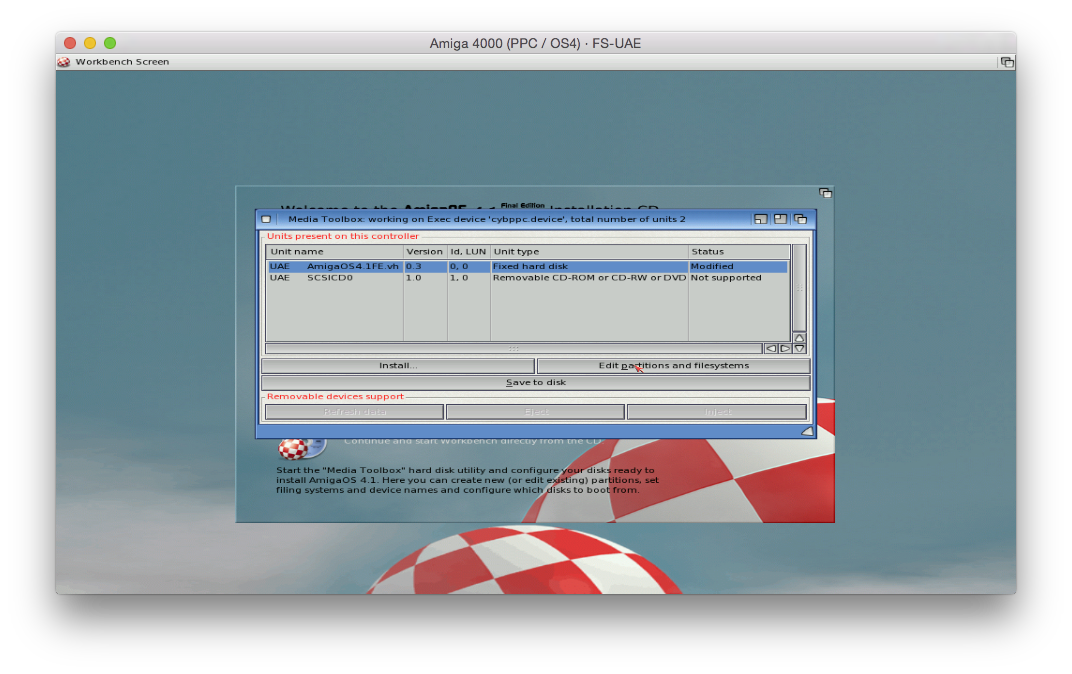
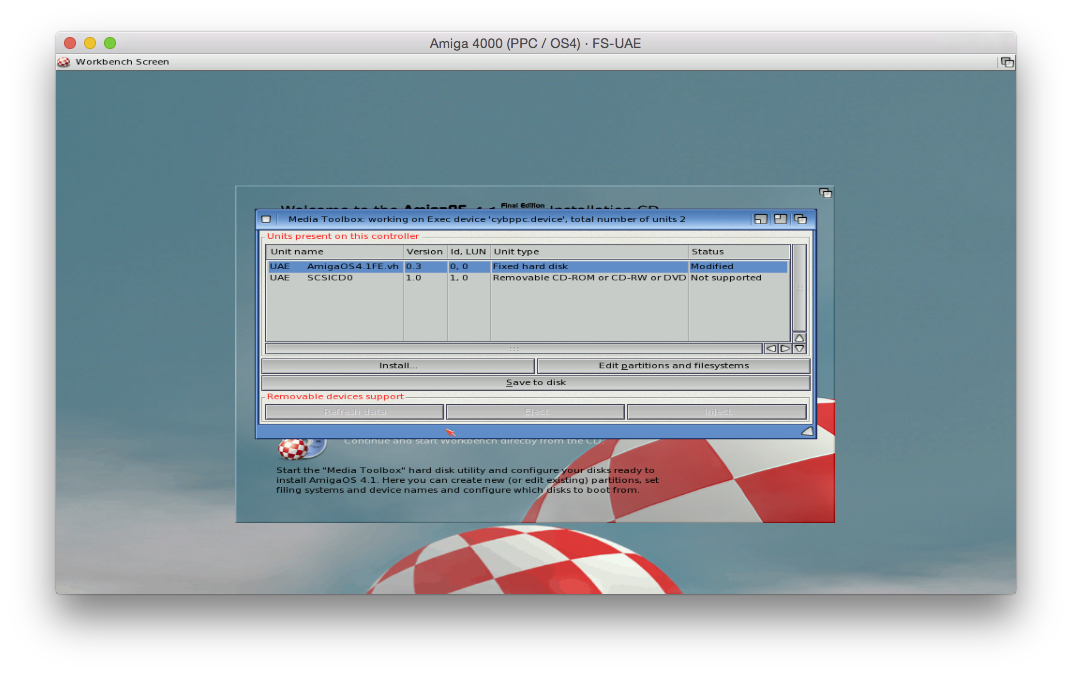
The AmigaOS4.1FE.vhd hard disk appears in the list along with the CD:
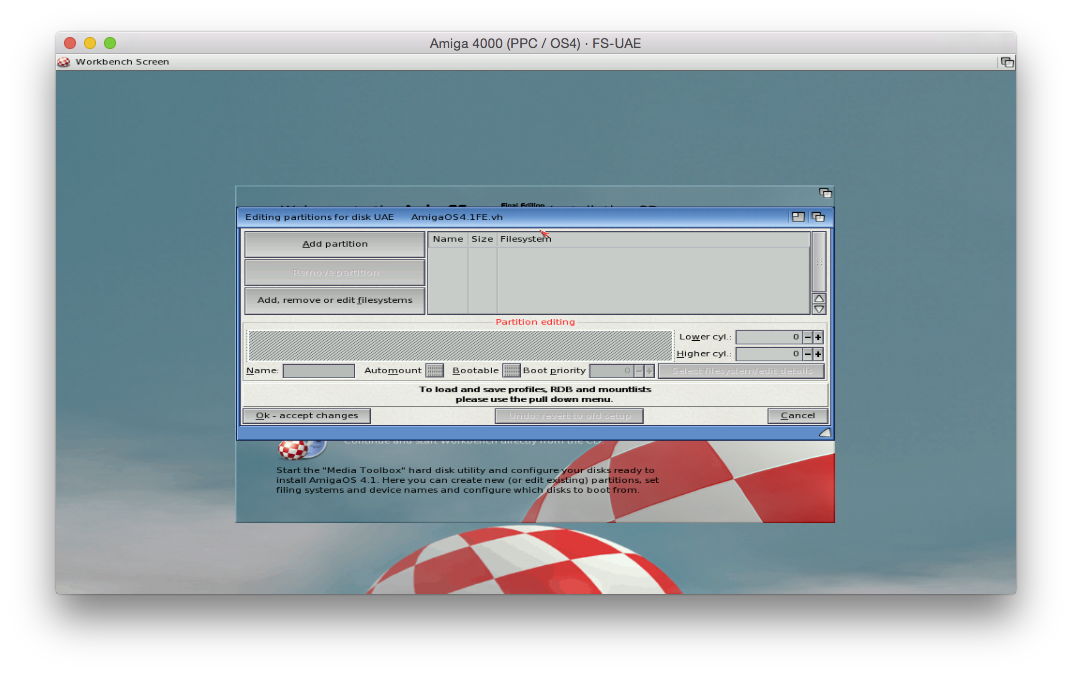
Select the AmigaOS4.1FE.vhd disk and then select Edit partitions and filesystems:
You may remember that I intend to use Smart File system (SFS) rather than the usual FastFileSystem (FFS). In order to do this, we need to install the SFS support to the RDB of the bootable hard disk - otherwise the disk will not boot.

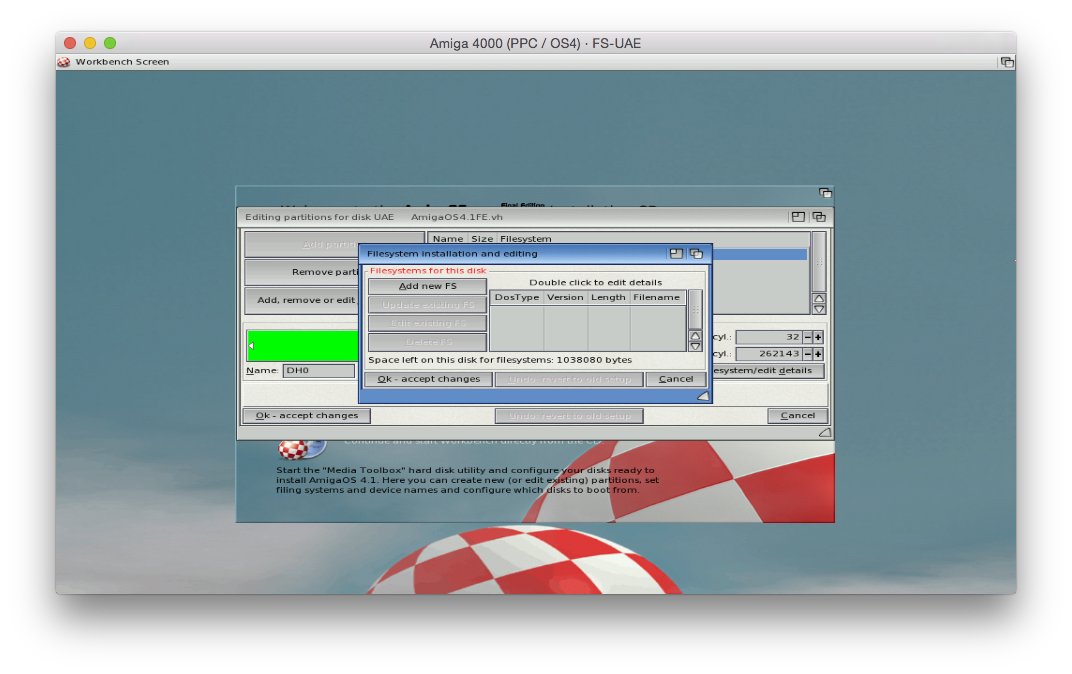
To do this, click on Add, remove or edit filesystem option- you will then get the screen below:

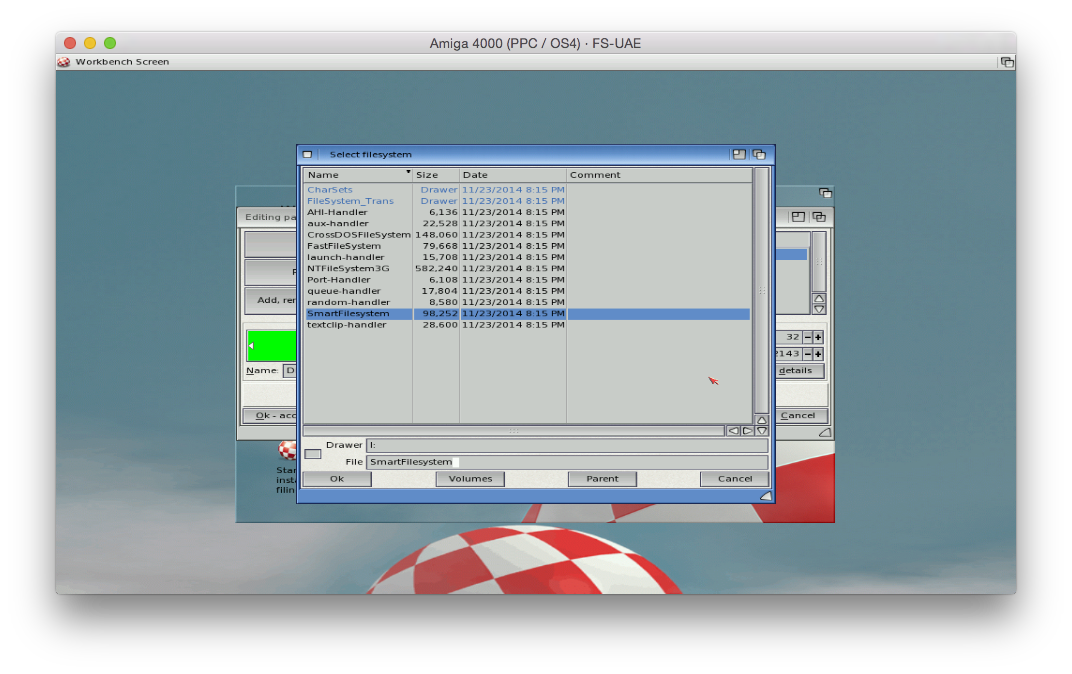
Click on Add new FS option, and then select SmartFileSystem from the dialog box that appears and click on OK:
It will then prompt for filesystem parameters - we need to modify the DOSType field, as it is currently using FFS to use SFS instead:
To do this, we change the DOSType field to 53465300 and press Enter - this will then change the filesystem on the right side to SFS\00:
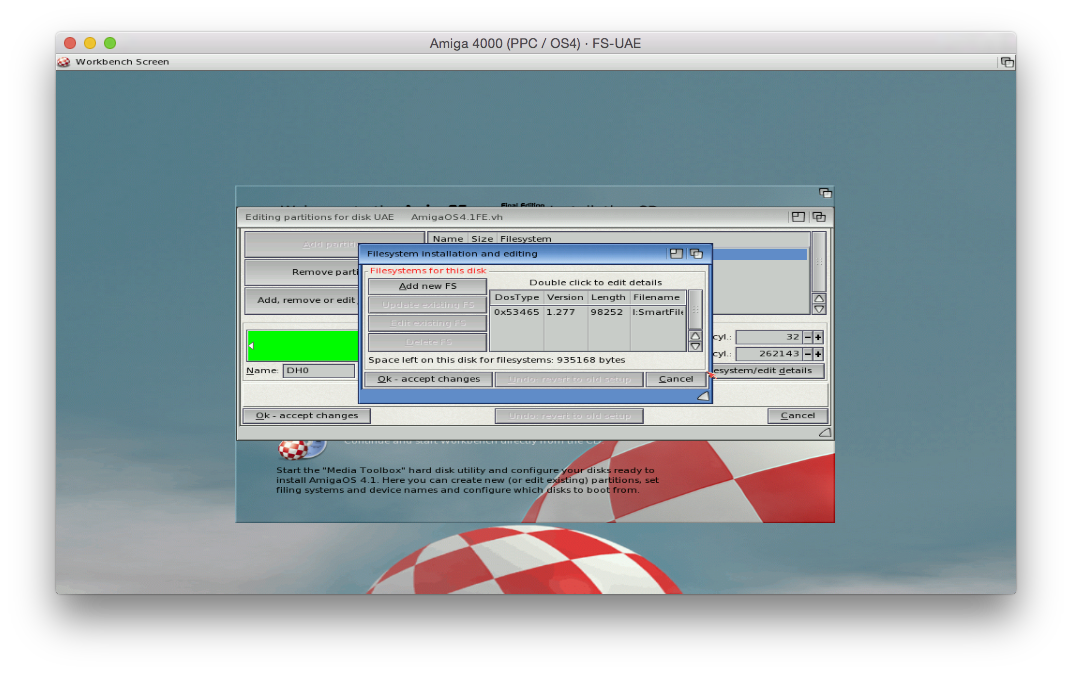
After you click OK you get the following screen confirming the additional SFS filesystem - click on Ok - accept changes:

We need to create a partition, so click on Add partition - It will create DH0 using the full partition space:
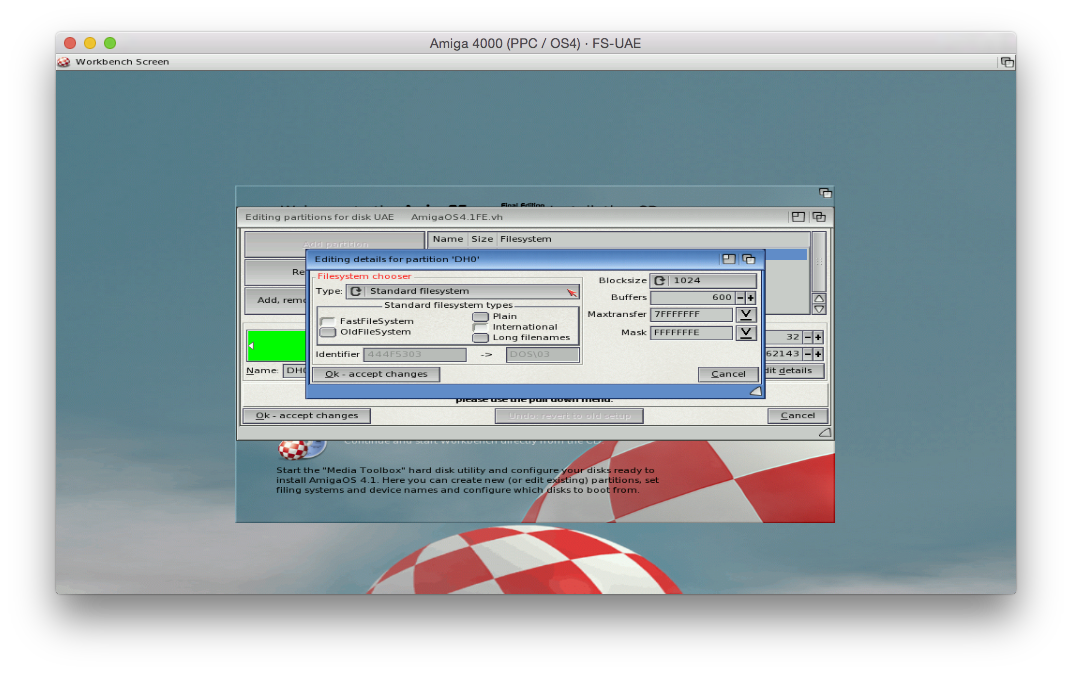
Click on Select filesystem/edit details button - you will then see the following screen:
 We need to modify the filesystem Type field from Standard filesystem (FFS) to SmartFilesystem (SFS\00):
Click on Ok - accept changes and you will then go back to the Hard disk partition screen:
You can see that the filesystem of DH0 is now SFS\00. Make sure Automount and Bootable flags are ticked, then click on Ok - accept changes.
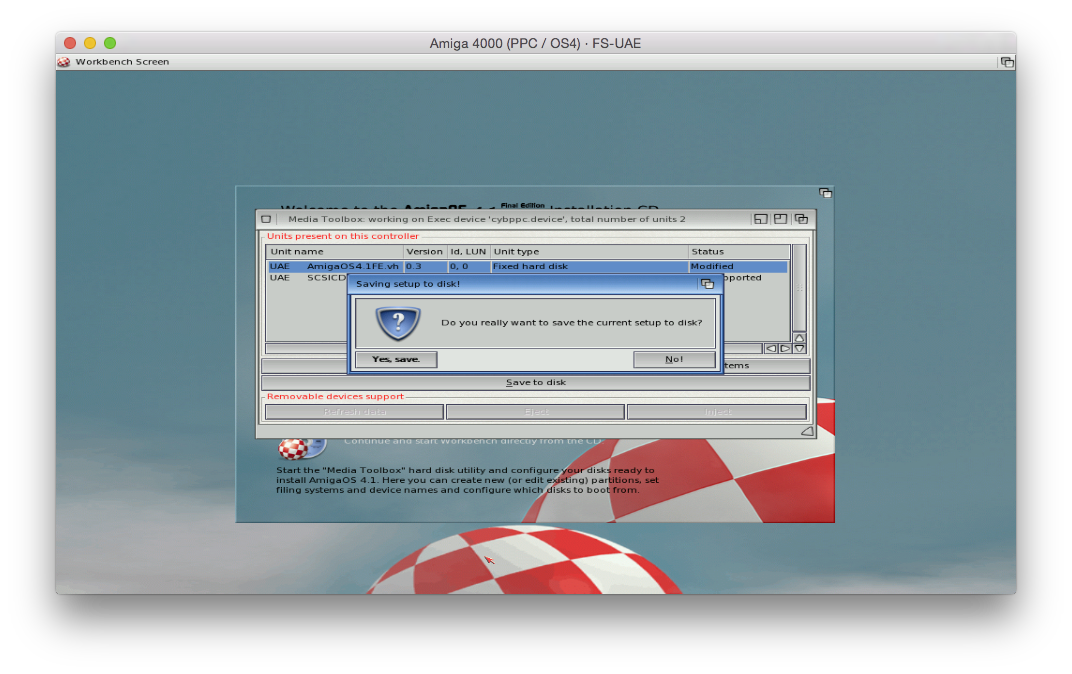
Now click on Save to disk:
It will prompt if you are sure - select Yes, save:
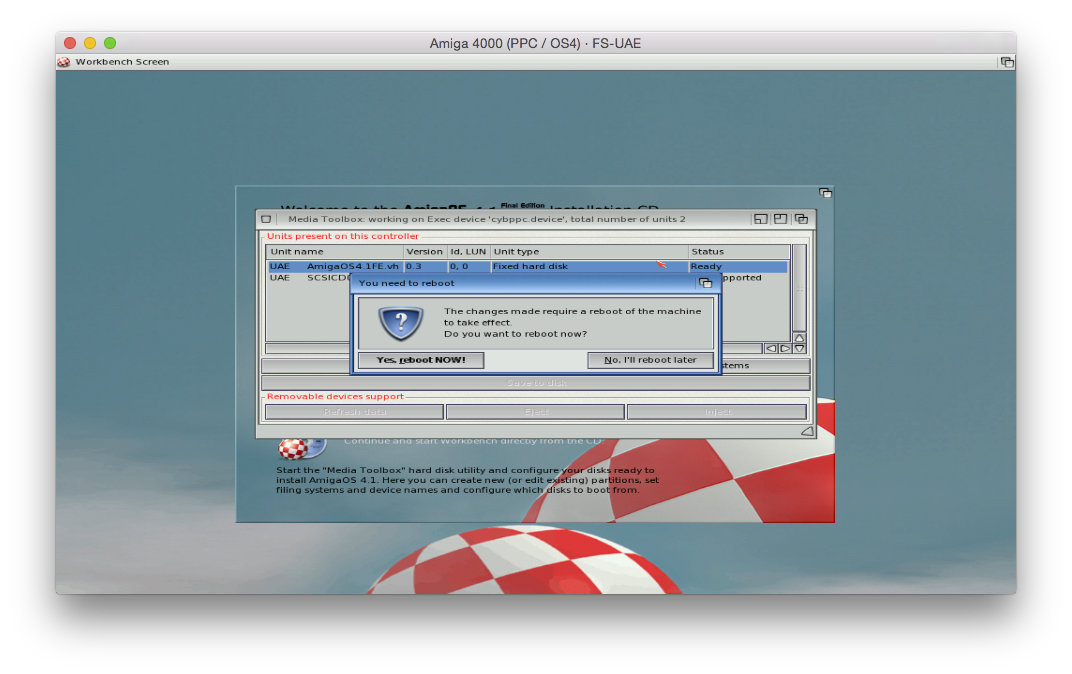
It will then prompt that a reboot is needed. Select Yes, reboot NOW!:
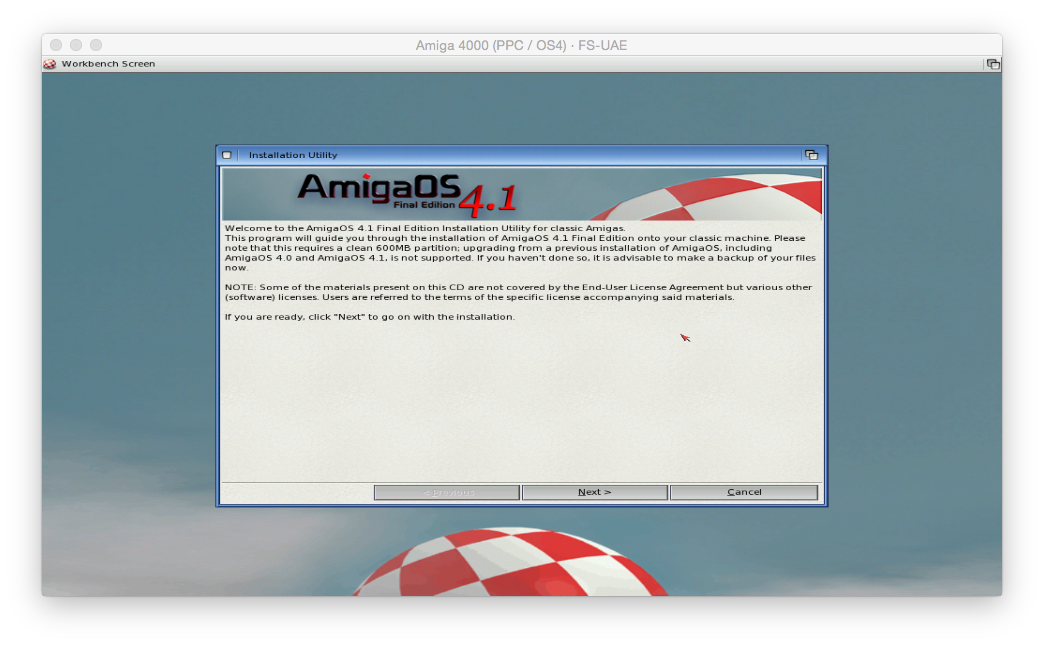
The AmigaOS4.1 Final Edition Classic iso will then boot again to the initial Installation setup screen as before:
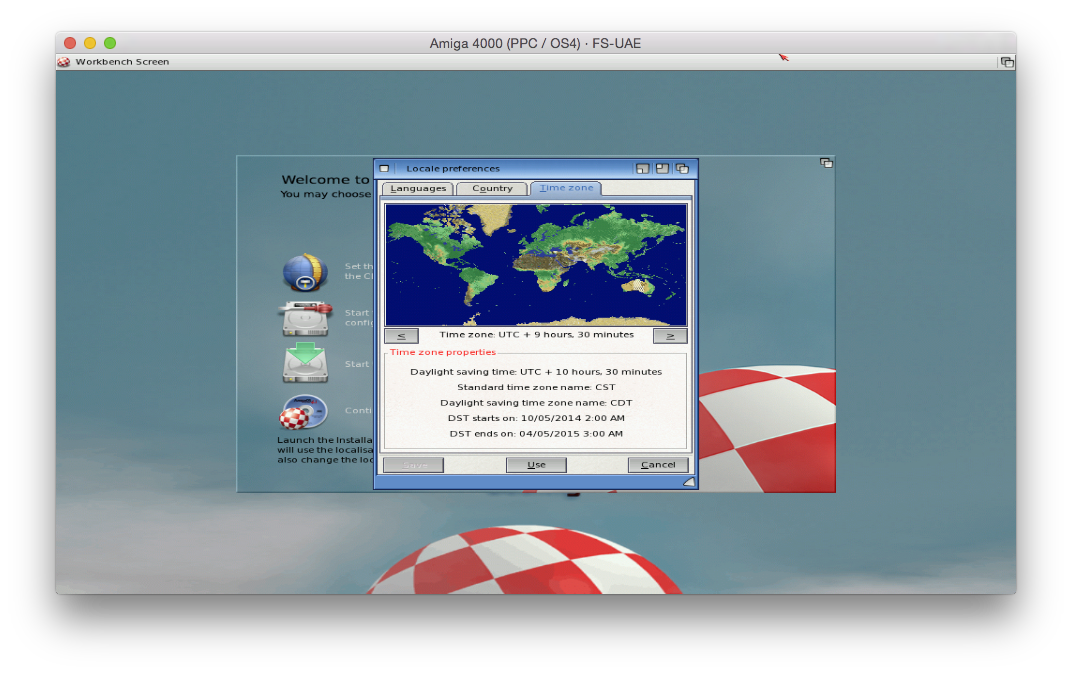
Set your localisations and keymaps option as you desire:
You can then click on the option to start the installation of AmigaOS4.1 Final Edition:
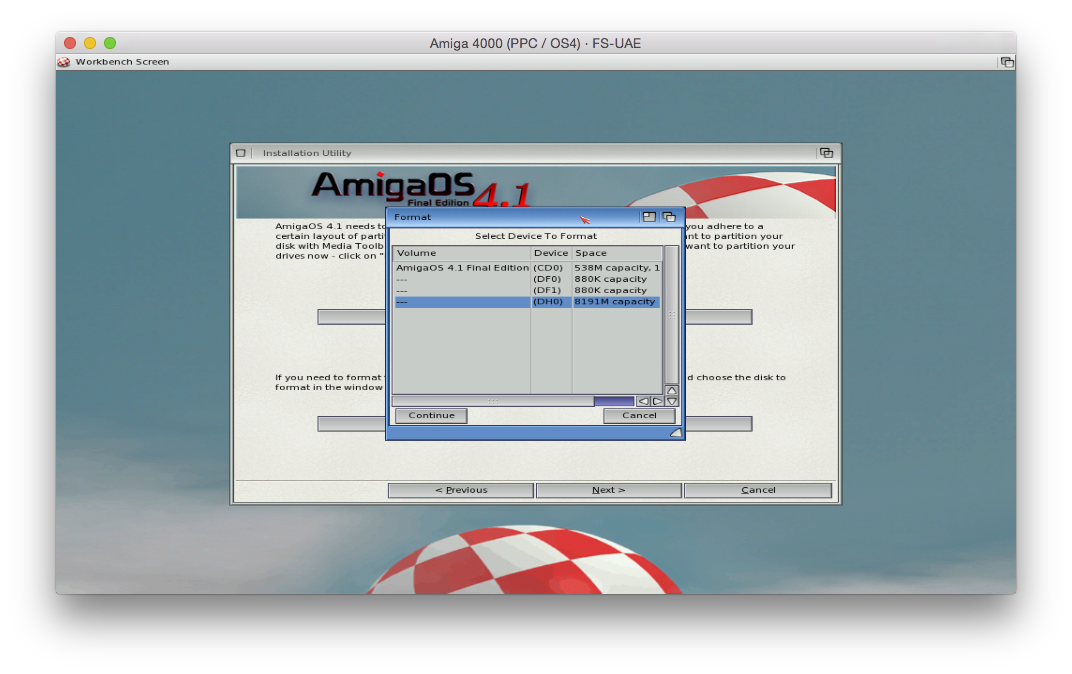
Choose DH0 as the destination:
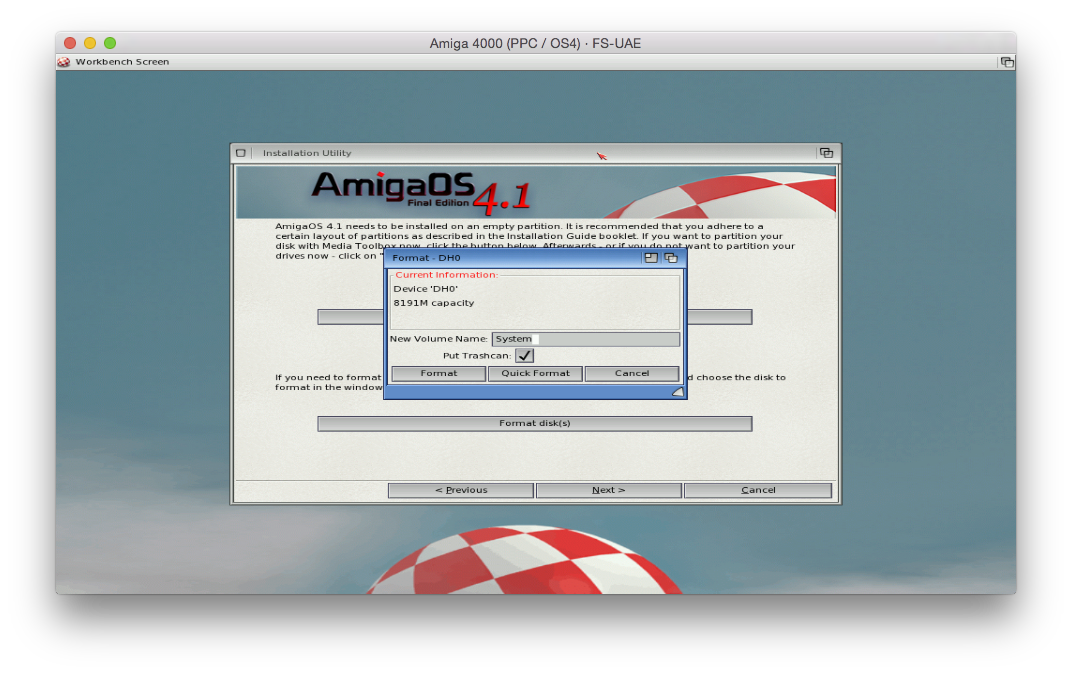
It will then prompt to format the disk. I labelled the volume as System. Make sure you uncheck the Use Trashcan option and then use Quick Format:
When the format is done you can proceed with the installation to DH0:
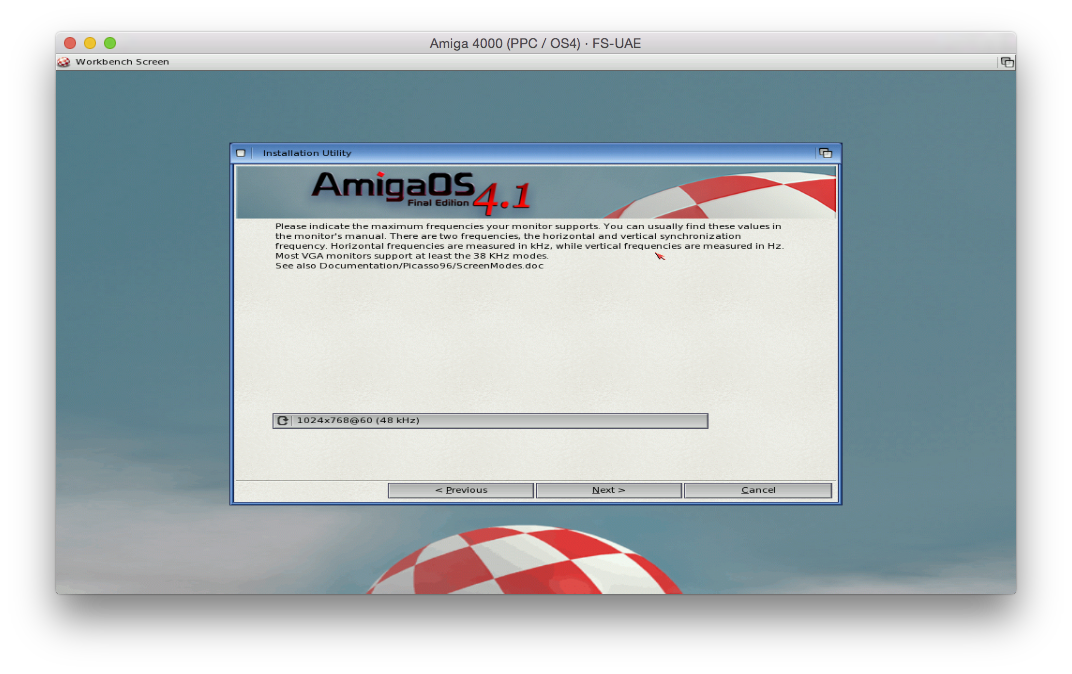
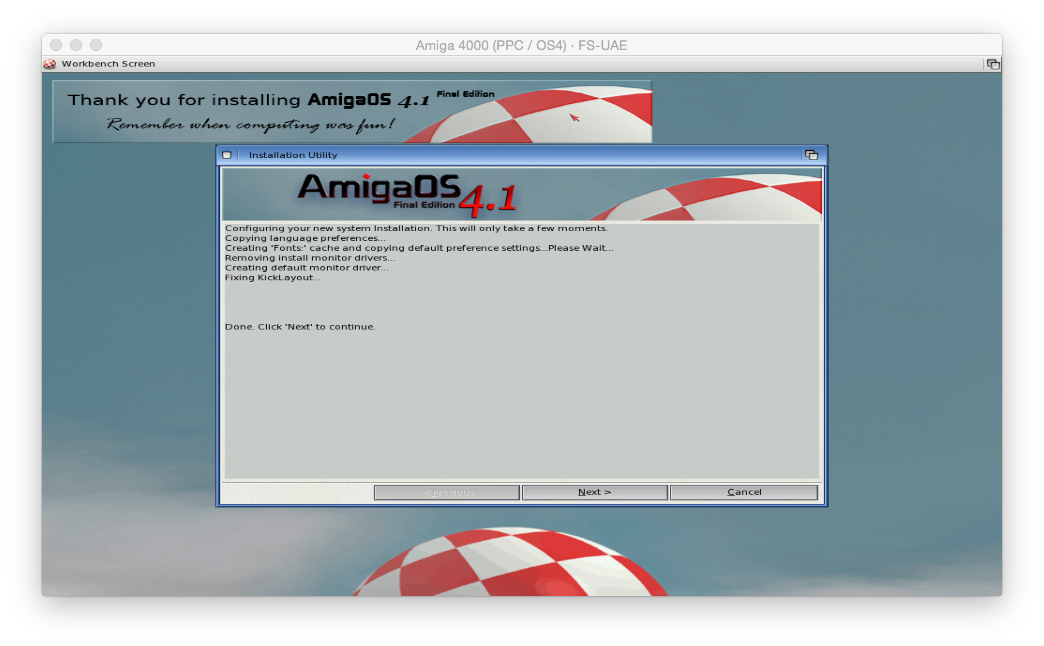
I have skipped some screens here as many you just accept the defaults - however, do select Picasso IV as the graphics (not AGA), ensure cybppc.device is selected (it is selected by default) as you go through the install, and that the screen size as 1024x768@60 (48Hz):
A final confirmation of your choices appears before the installation proper begins:
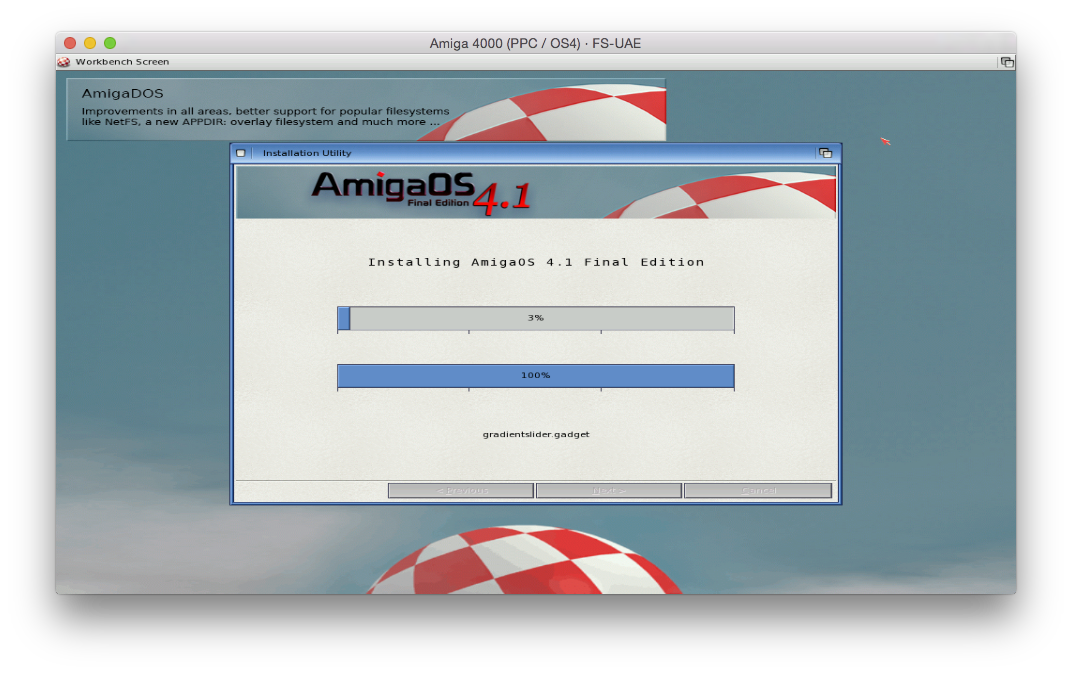
Installation then proceeds - coffee time:
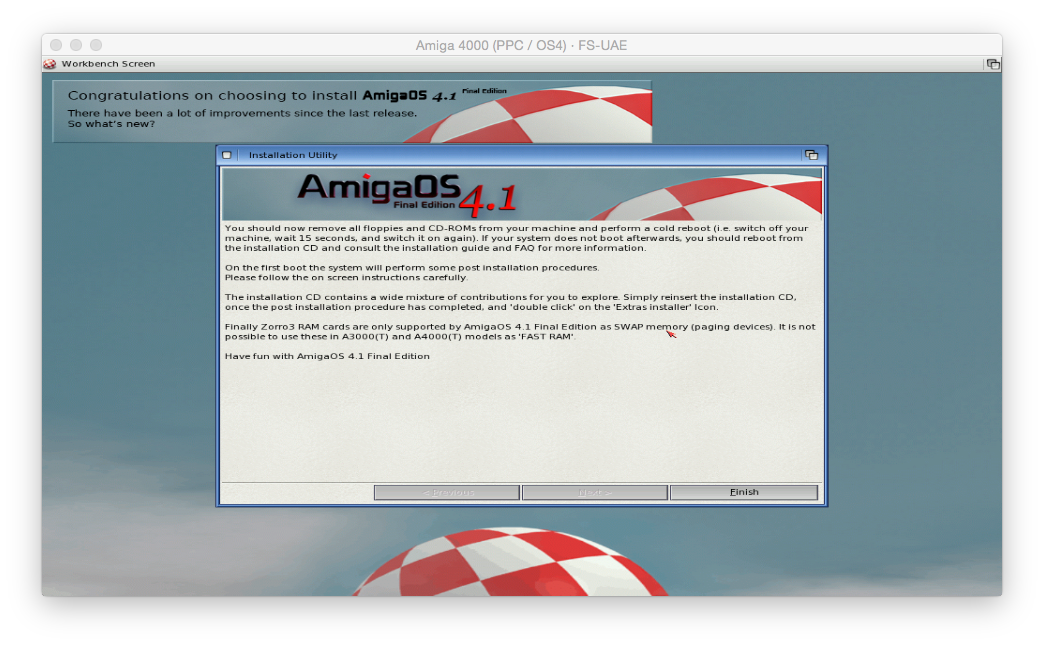
Installation is completed successfully!
Do not click on Finish on the last screen yet....
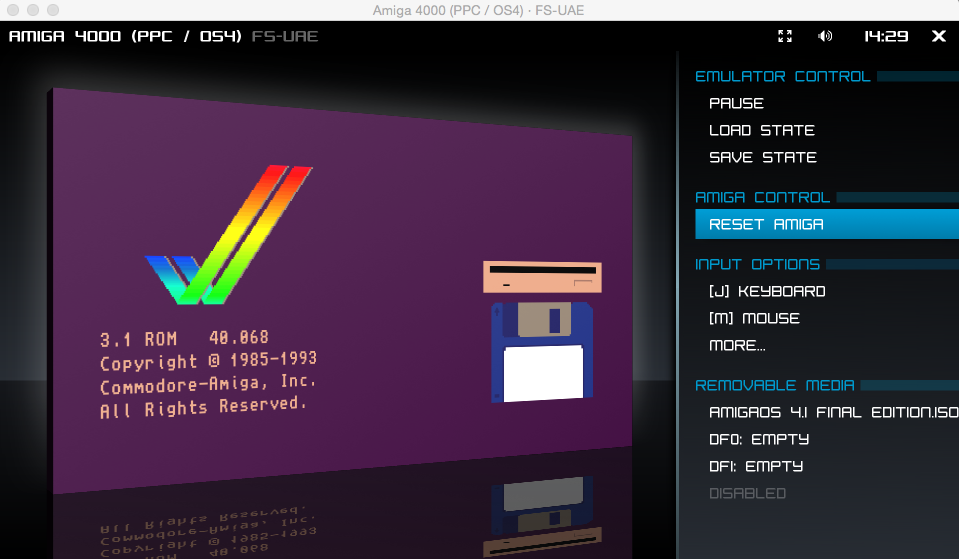
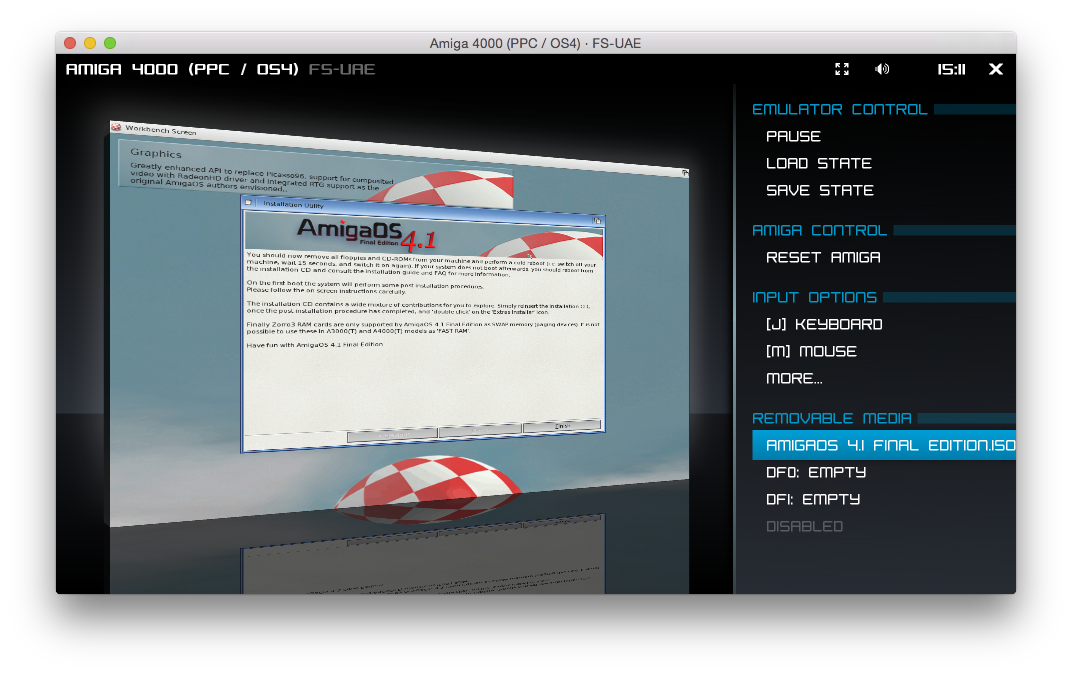
First, Press Function + F12 to bring up the FS-UAE menu and eject the AmigaOS4.1 final Edition iso as below - use cursor keys to navigate to the Removable Media, highlight the iso, and press Enter:
You now have the option to Eject - press Enter on it to do so. Then you can click Finish on the last screen to reboot the Amiga. (If you don't do this then the live cd will boot instead of the hard disk)

If it doesn't boot for you, make sure you check that the SFS file system is installed as I detailed above, the CD has been ejected, and that the hard disk is set to bootable.

The first time I did this I forgot to set the Bootable flag (!), so I just got the Insert disk screen and a non-bootable hard disk as shown below in the Early Boot Menu (press both mouse buttons when booting):  
I then mounted and booted the AmigaOS 4.1 final Edition Classic iso again (via Function + F12), ran the hard disk partition tool option and quickly fixed DH0 to be bootable and all good:

Success - it now boots AmigaOS 4.1 Final Edition from the virtual hard file and presents me with the standard post-installation options screen!
I then mounted the AmigaOS 4.1 Final Edition Classic iso again briefly while I ran through the Extras installation:
Extras installation in progress - I just left out the PCI Catweasel drivers:
I now have a working AmigaOS 4.1 Final Edition Classic setup on FS-UAE on my Macbook Pro
Next step will be getting the network card working on emulated system...which requires the ethernet.device driver from Aminet. Then Amistore, toccata support and more! But that is enough work for one day - I'll cover these in a future blog entry!

Indivision AGA Mk2 on Amiga 4000T

$
0
0
Today I am taking a look at the Indivision AGA MK2 A1200/A4000T scan doubler, and how to tweak the initial terrible output for TFT screens on my Amiga 4000T.


I covered my Amiga 4000T in a previous post here if you want to be familiar with the hardware setup I am using.

I am running AmigaOS 3.9 BB2 with AmigaSys4 on my Amiga 4000T with dual display using PCI Voodoo3 card for the Workbench and the Indivision AGA Mk2 for the native Amiga video output.

The Indivision AGA MK2 A1200/A4000T is a scan doubler card from Individual Computers. You can buy it from Amigakit, Vesalia, AmigaStore.eu and other Amiga dealers too.

Once installed inside your Amiga 1200 or Amiga 4000T it allows you to have scan doubling of standard Amiga graphics modes to a DVI connection, allowing display of low resolution output Amiga's do on modern TFT screens. Note that this is not the later CR version, which cannot be fitted to the A4000T without modification to the A4000T. This version does not need that:


The board itself is small and is designed to be installed over the top of the Amiga display chip, thereby taking the signal directly:


The cable to connect to the separate DVI connector is all included. This allows you to position the DVI connector into the A1200 spare expansion slot at the rear of the case.


However, an Amiga 4000T has no such space. I also don't have a spare full length DVI backplate. So, well, I mounted the DVI connector to a half height backplate and attached it, less than professionally, with a pin holding it to the A4000 backplate - but hey it works and it has been like this for a few years now!


Out of the box, the Indivision AGA MK2 will immediately display on a TFT screen. Trouble is, you get terrible background vertical lines across the display, it is off centre and doesn't come close to filling the display.

To fix this, you need to download the Indivision AGA Config Tool 1.1 and updated Core 2.6 from Individual computers website here - there is later config tool too, but the earlier version with the core upgrade is needed initially:


Once downloaded, extract it to RAM:


The resulting drawer is like this:


Showing all files in the drawer reveals the Readme.txt:


The readme.txt explains how to install the software and how to use it. However, the instructions on how to use the tool leave a lot to be desired. I will show in some detail how to use it in this post.


Installation involves running a Shell window, cd to the drawer where the files were extracted and typing in Install, which will put everything where it needs to be:


That done, I move to the System:Prefs drawer to open the Indivision AGA MK2 Config Preferences tool called Indivision:


Here is the Config Tool:


From the Menu (right click on the top Workbench bar), select Tools > Reflash all to upgrade the included Flash to the 2.6 Core version.

I couldn't see a way of confirming what version is currently on the Indivision which is annoying, but since I bought the card before the core 2.6 update was released it is safe to say (in my case) that the flash upgrade was needed.

The Config tool shows settings for Euro36 in Amiga Mode, but we can quickly change it:


In the Amiga Mode section, I change it to PAL:


Before changing anything in the settings, I recommended right clicking on the Menu (Workbench top bar) and select Config > Save Config As... and save the current working config with a different name in case you run into trouble and need to load it back again - it saves in Sys:Prefs by default:


As part of the flash upgrade, the Indivision AGA MK2 now has two new VGA modes to select from, which allow the standard PAL and NTSC modes to display properly and remove the horrible vertical lines I saw on the original core. These modes are "new 640x480 60hz" and "new 768x576 60hz":


From the menu (Right click on Workbench top bar), select Config > Override Limits to allow us to modify some of the settings we need to get the display entered correctly. I then modified (as above) the H-offset (Horizontal offset) to 72 and V-offset (Vertical offset) number to 20 to centre it on my TFT screen.

My TFT screens are a 1280x1024 Samsung Syncmaster 913N screen running VGA connection (with DVI adapter) to the Indivision AGA Mk2.

You click on Test to try out the mode - if it doesn't display, it's reboot time as it doesn't auto cancel if it doesn't work! I apologise for the screen artefacts in the photos of the screen, caused by the iPhone I was using to take the photos.


As you can see it is not centered correctly.  You can click Apply or Cancel (assuming it displays) to accept/reject the changes. I kept playing with the H-offset and V-offset numbers until I got it as close as I could to the edges of the screen.

Higher H-offset Positive values move the default area more to the left, Higher V-offset values drop the default area further down the screen from the top.

It is not perfect, little bit cut at the bottom, but not bad:


Once happy I go to the Menu (right click on Workbench bar), and select Config > Save Config.

You need to repeat this for every screen mode you want to use.

For PAL and NTSC modes only, you also need to configure the overscan preferences settings - this must be done too. You can access these setting in the Overscan Preferences in System:Prefs drawer:


Select PAL, and then Edit Text Size and Edit Graphics Size in turn to move the screen so it is as viewable as possible on your screen, as below - here is the initial setting when editing, way off centre:


Here it is after positioning:


Click OK when happy and then click on the next mode (eg. NTSC) to configure. When done, click Save in the Overscan Preferences program to commit the changes. It will try to commit the changes right away, but in my case I needed to reboot due to some background programs running.

Going back to the Indivision AGA MK2 config Tool in Preferences, I can then select NTSC to use the same new VGA mode as PAL is using:


Note I tried using the 768x576 mode but it didn't work on my display - your mileage may vary.


Again, I need to adjust the h-offset and v-offset values until the Default area fits within the screen:


Now it fits horizontally, I need to adjust vertically:


Ok, this is as good as it will get. Probably if I used the non-working higher mode I can fill the screen vertically, but this is centered and I don't use NTSC much given most stuff is PAL:


Again, once happy make sure you Apply the setting, then right click on the Menu (Workbench top bar) and select Config > Save Config.

Remember that for NTSC we also need to modify the Overscan settings, as I did for PAL above:


Click Save when happy, as before. I needed to reboot.

Having done this, I can try out some demos and games using the new Indivision AGA MK2 updated Core, and I am happy to report the vertical lines and off centre display are all fixed:


I also tested a WHDLoad game - specifically I chose Agony as I know it uses PAL interlace and PAL standard resolutions, which work fine and fill the screen perfectly:


So happy to not have the vertical line issue anymore - the iPhone I used to take these photos adds some artefacts to the photo but I assure you it is perfectly clear of lines:


The Indivision AGA MK2 is a great piece of hardware, let down a little bit by the complexity of the Config tool, lack of useful documentation on how to use it, and the fiddly configuration of the screens to suit your particular screen setup.

But if you don't give up, you can get a great result and I am now very happy with it! I no longer have any CRT monitors for my Classic Amiga systems thanks to Indivision cards for my Classic systems, and I am very happy about it!

My Commodore 64 has arrived with SD2IEC and Chameleon64!

$
0
0
I received my Commodore 64 this week! I am keen to try out SD2IEC and Chameleon 64 on it! This is not strictly Commodore Amiga related, but it is Commodore related so it is close! Please forgive me - my regular Amiga posts will be restored after this one I promise!


I had a Commodore 64 way back in 1982 until 1987, when we traded-in and upgraded to the Commodore 128, and then to the Amiga 500 in 1988. I bought a C64C in the mid 1990's, but I decided to focus on Amiga and NG Amiga computers only for my Retro fix, and got rid of all other Retro systems around 10-12 years ago.

But I got the itch to play with a C64 again after seeing some of the games and demos recently released in 2015 for it! So one eBay auction later and here it is!

This is the breadbox version of the Commodore 64, and as you can see it is in good condition with no yellowing to speak of:


This C64 also has a sd2iec add on installed inside the C64, which also allows loading C64 disks from SD card - and the previous owner has made a small slot for the SD Card on the left side of the case to allow easy transfer of additional image files to the C64 as new demos and games are released.


The other modification made to this C64 is a AV out conversion. Normally the C64 has RF out only, which is annoying to setup on a TV these days. With this AV out conversion there are new ports on the rear of the case for standard S-Video, RCA video out, and left/right RCA audio out cables to be connected to a modern TV.


I had some issues with the power supply when I first got it - it wouldn't power on at all. I traced the problem to a blown fuse in the power supply. Once swapped for a new one, the C64 was ready to go!

Initially I tried out the sd2iec built in sd card loader, by typing in load "FB",8 and typing Run. It then loads a menu of games to choose from, reading from the contents of the SD card inserted into the side of the C64.


I choose Wizball, and here it is running:


But, the sd2iec is limited in some ways, and loading times are the same as for normal floppy disks unless you have a Fast Load cartridge installed as well (which I don't have). On the positive side it is more compatible with disk images as a result.

What I do have also though is a Chameleon 64 Cartridge. This cartridge can operate as a C64 re-implemented in FPGA on it's own - no C64 needed. This is how I have used it until now. It can even run other cores to be a complete Vic 20, Atari 2600, Atari 800XL, Amiga, and other computers too!

But it can also be plugged into the real C64 cartridge port and open up new functionality, such as being able to load tape, cartridge and floppy disk images as fast as possible from a SD card.


The Chameleon 64 also supports internally a Retro Replay network card expansion (which I have already and plan to add into it soon) that with a new operating system called Contiki allows the C64 to be on the network, have internet access and act as a web server like this one! Never tried it and very keen to do so soon!

After installing the cartridge and turning on, it quickly boots into the familiar Chameleon 64 menu to choose cores or browse C64 disk/tape/cartridge images to load up, but now running through the C64 display rather than it's own VGA out port:


And yes, I know there is a newer Core Beta 9 released this month I can load onto it - I plan to do it soon but wanted to make sure the existing setup worked first.


Demos or Games?


Shot of the Chameleon 64 plugged into my C64:


This shot shows the Chameleon 64 and also the AV ports a bit better.


 Games it is - and Mutants is the game to try out via the Chameleon64 - it loads really fast!


I also ran a Razor 1911 demo from Revision 2014 too from the Chameleon64:


And another demo - Pimp My Bento, by Noop, released recently at Assembly 2015:


I am very glad to have this C64, and with the modern SD2IEC and Chameleon 64 hardware with AV out it is legacy free and wait-free! I can enjoy the C64 again in 2015!

Selection of Classic Amiga Software in 2015

$
0
0
This week I decided to catch up on some of many AmigaOS3.x software that has been released in 2015 but I haven't tried out yet! I used AmigaOS3.9 on my Amiga 4000T to try them out.


My Amiga 4000T had remained relatively untouched with new software for a while now, so I thought I would update it, starting with MUI (Magic User Interface).

On my system, I have MUI 3.8 registered. Like a lot of people who registered relatively late on, my MUI key is a "special one" given to everyone who registers now since apparently the author Stefan Stuntz can't generate new ones as his Amiga 3000 stopped working...


MUI is needed for lots of programs, and the last update of MUI for AmigaOS 3.x was in 2006. It has continued development as MUI 4.0 on MorphOS and AmigaOS 4 as well.

But now in 2015 we have MUI 4.0 for AmigaOS 3.x! You can download it from muidev.de/downloads here:


The latest version is from June 2015 - it is great to have new software for Classic Amiga in 2015 isn't it?

Once downloaded and extracted to RAM: we get the following drawer:


Here is the Readme - doesn't say too much of relevance:


After backing up my existing MUI 3.8 drawer (just in case), I then ran through the installer, and upgrade my existing installation:


Note that for me it prompts me during the installation to delete a number of files no longer needed in the new version, which I do:


The installation detects my existing MUI 3.8 install and prompts me to update it:


The usual extra files are available to be installed, which I do:


Language of the Amigaguide document files is requested - English for me of course:


Installation completed:


As prompted I reboot, then check the MUI prefs to see the updated MUI v4.0 program settings:


Close up view of the MUI Preferences window in MUI 4:


MUI Screen Settings:


MUI Images settings:


I do get regular prompts to increase the stack to minimum 32000. For most programs the stack can be adjusted in the Information window attached to the program's icon.

Now let's take a look at Directory Opus 5.9 for AmigaOS 3.x. Originally released in 2014, this update is an update and bug fix from the original 1998 commercial Directory Opus 5.82 source code from Adelaide developer Jonathan Potter (GP Soft). The latest beta version of 5.91 is April 2015. I am looking at stable 5.90 release today.


I have had a look at Directory Opus 5.9 several times on this blog for AmigaOS 4.1 on the X1000 (here, here and here).

But this is the first time I have installed it on the Amiga 4000T - I download it from the Source Forge page here, and below is the extracted drawer on my Amiga 4000T:


Closer look the Directory Opus 5.9 drawer contents:


I need to add the DOpus: assign into the s:user-startup file, as highlighted below:


The initial load of DOpus 5.9 looks a bit ordinary - it uses the Workbench prefs and opens on it's own screen using my Voodoo 3 PCI card, but uses the standard Topaz fonts...


Reconfiguration now underway - I covered a lot of this in the previous Directory Opus 5.9 blog entries I linked higher up if you want to look into the detailed configuration steps:


After finishing the fonts changes, background change and lister preferences to my liking, things are starting to look good:


My USB stick (Sony16GB) mounts and shows up fine under DOpus 5.9 when inserted into the A4000T USB port connected to the Deneb card:


As people who regularly use Directory Opus 5.9 (or earlier versions ) know, it is very configurable and there is a LOT you can do with it. I will leave it like this for now, but no doubt I will play with it again!

Moving into 2015 games now, Boxx 2 is a platform game by Lemming880 available on Classic Amiga systems and downloadable for free on Aminet, as HD install or ADF version.


The game is colourful and retro:


Let's get into Level 1:


The game is very playable and easy to get into. Collecting coins is the goal, and if this sounds a bit like a game similar to a certain plumber then you would be mostly right:


Unlike that game though, Boxx 2 has levers to unlock sections, water you can go through and is just a fun game to play:


Evidently I need to practice more because I quickly reached Game Over - not sure what happened! I used to be great at platform games!


Boxx 2 is a lot of fun to play and free - definitely give it a go!

Next up I wanted to try out the latest version of LoView 2.90 on Classic Amiga, released in 2015. This program was written by Simone "Tuxedo" Monsignon. I read the readme first to make sure I knew what to do for the install.


The readme says, install the Hollywood plugins, copy the folder where you like and run it. LoView is a program written with Hollywood. It won't work unless you have all the pre-requisites installed first, which I didn't. I got plenty of errors come up running the Installer program. What it should say also is it needs the following installed first:

1. Install all the latest July 2015 released Hollywood plugins for AmigaOS 3.x on Aminet - search for HWP_ to find them (MUI Royale is one of the required ones):


While installing MUI Royale (one of the Hollywood plugins), you will then find you need to install some other MUI class files too.


 This leads on to the next step to install LoView 2.90..

2. Install the latest version of TextEditor.mcc and TheBar.mcc and NList.mcc, available on Aminet. You can install codesets.library too if you need, but in my case I don't since I work in English.


3. Then install the LoView program using the Install icon in the extracted folder - the installer is fairly straightforward:


Fairly straightforward stuff until you get to this step - not sure why this step (for the AmigaOS4.1+ version) is included in the AmigaOS 3.x version installer. Just say No here:


The new preferences tool for LoView will then launched:


This prefs editor allows you to customise LoView to your personal tastes and there are plenty of options, including changing the default file types to use LoView, which is very handy indeed (Reboot needed for that). Press Save when finished in here:


Installation is now completed:


Here is the LoView drawer with the installation completed:


Here is the main LoView program itself running on the Amiga 4000T - I think I am still missing something as two icons on the top right don't appear right - AISS perhaps? Will look at this later on:


Having used and covered LoView extensively on AmigaOS4.1 on my X1000 previously, it is nice to be back in a familiar image viewer on the Classic Amiga too:


I should make mention also of A-Eon's Personal Paint 7.3a released for Classic Amiga in late 2014. This is the result of the fine efforts of Andy "broadblues" Broad.

I already had the AmigaOS 4 version on the X1000, but this week I finally bought the Classic Amiga version to put on my Amiga 4000T.


You can buy Personal Paint 7.3a from AMIStore if you have an AmigaOS4 system, and if not you can also buy it from ppaint.com. There is an older version 7.2 you can download for free on the same site.

Once launched, Personal Paint asked which resolution to launch in - I want to take advantage of my Voodoo3 card in the Amiga 4000T so I use the 1280x1024 resolution. Personal Paint is limited to 256 colours, so no high colour support yet.


Here is the main Personal Paint 7.3a program once opened. The interface should be familiar to Deluxe Paint users, and of course Personal Paint users from past versions before A-EON bought the rights to the software to upgrade it:


When importing pictures that are different resolution and colour depth to the current screen, it gives you options around which mode to switch it to:


It will then work it's magic to change the size and colour depth to match the screen:


There are lots of functions in Personal Paint, more than I could possibly cover in a blog post like this, but it really does do most things you would like to do with an image, even animating it:


There is a comprehensive Amigaguide document included with Personal Paint, which includes tutorials and plenty of help:


Here is one more image I imported, rendered in 256 colours in Personal Paint 7.3a - the image conversion is quick for a Classic Amiga and result quite good:


Of course what coverage of Classic Amiga software released would ignore the demos released in 2015! Head over to Pouet's demoscene website here to download the latest productions for Amiga (and other platforms too).

Here is some shots of Dekadence's demo at Assembly 2015 demo party, called Carbon Based. It is a great demo and worthy winner:


The next demo I wanted to mention is Desire's demo, also from Assembly 2015. It is great to see good demos still coming out on Classic Amigas - I wish we had some on the NG Amigas too though!


So, as you can see, there is still plenty of interesting software being released for Classic Amiga in 2015! This list of software is only a small sample of what is available out there, and it is great to see the work that has gone into them! Please try them out if you haven't already!

Thank you to the people who continue to write interesting software for Classic and NG Amiga systems in 2015 - please keep it up! :-)


Icaros Desktop 2.0.3 and Odyssey 1.25 Beta on Core i7 PC

$
0
0
Today I wanted to take a look at a recent build I did this week of Icaros Desktop 2.0.3 on my Core i7 PC. This allowed me to try out the new Odyssey 1.25 Beta build too, which for NG Amiga systems is currently only available on AROS.


As people may be aware, the driver support of hardware for NG Amiga operating systems is a limitation to be aware of, and especially with AROS systems like Icaros. This is because unlike PowerPC systems for AmigaOS and MorphOS, there is many more hardware combinations available which can make it hard to know what platform you can run it on and have full support of your hardware.

The AROS compatibility Wiki is a great place to start to help with this.

Until now I have been using Icaros Desktop 2.0.3 on my Acer AspireOne ZG5 netbook, which is fully supported by AROS. I covered this on my blog previously here. However the screen is very small and performance is not fast for games and demos I want to use on it.

So in my case, I wanted to use my Core I7 system I built in 2011 for Windows 7 (and now Windows 10) to now run Icaros Desktop 2.0.3. Here is some photos of the system when I first got it in 2011.


As you can see the system uses a X58A-UD3R Gigabyte motherboard:


As you can see this board supports up to four PCI-e graphics cards, although the double width nature of most cards means 3 is the realistic maximum that can be installed in reality.

I also have a 128GB SSD, which was running Windows 7 Pro before I reformatted it to use for Icaros Desktop. I also have 3x3TB SATA disks installed, and a BluRay Recorder SATA drive.


Here is a close up of the components all installed in the Arlec case. The Geforce GTX580 card pictured here failed, and I got a replacement Geforce GTX680 card.


Here is a view at the back and front of the system:


However in AROS my GTX 680 card is not supported, and neither is the onboard network card or Soundblaster X-Fi card.

So I found a 3Com Etherlink 905B PCI card second hand, and also a second hand Geforce 8800GT PCI-e graphics card, which supports 2d and 3d acceleration support in AROS. And most importantly, the graphics card I selected carefully supports 2500x1600 resolution DVI-D output, which is needed for the 30" screen I use on the PC normally.


Compared to the GTX680, the 8800GT is a small card, using only two slots instead of three and not a full length card:


Here is the Geforce 8800GT installed, ready to go (yeah I know the inside of the case is dusty):


Of course, one of the big attractions in this process was being able to run a NG Amiga OS on my 30" screen. Booting off the Icaros Desktop 2.0.3 Live DVD I could enjoy this view at 2500x1600 :-)


Make sure when booting to select the Native graphics mode when prompted, which is not the default option.


You can change this default later in the Grub.cfg file to use default=0 instead of default=1 in the AROS system folder. The VESA mode is to allow most cards to work - Native graphics mode only works for graphics cards fully supported by AROS, as covered in their compatibility Wiki.

If the native mode works then you can choose all the resolutions available for the card, which you can check in the Screenmode Prefs. If using VESA mode then only one resolution is shown, which means your card is not fully supported by AROS:


I then got started on the installation process to install Icaros to the SSD, which involves wiping the disk when prompted how you want to install it, rebooting with the live DVD again, running the install process again and selecting to use any available AROS partition to install.


Due to the high resolution these screens are, please click on the images to see more clearly. I haven't worked out the screen grabber that allows you to grab just the windows - the included one only grabs the whole screen!


You can then choose what partitions you want, and what components you want to install:


After some more screens to select, the install gets underway:


Install successfully completed - we can remove the DVD and reboot into Icaros using the SSD disk now!


Across Desktop 2.0.3 is great on a 30" screen, and it boots very quickly. 


The decision to run DOpus 5.91 in place of the Wanderer GUI is great:


Some more screenshots of the environment, showing Harmony Player, LoView and the older version of Odyssey, which will be upgraded shortly.


Here is some shots of Odyssey 1.25 Beta now installed on Icaros Desktop 2.0.3 - follow the instruction on this thread to download and install it:


Of course I went straight to YouTube to try out the fixed YouTube playback functionality (since YouTube upgraded their website engine):


Pleased to report it works well:


Playback is smooth in normal mode - the wide mode varies for some reason. Full screen mode is not available yet.


Unfortunately we can't play ABC live TV streams anymore - this used to work in Odyssey on AmigaOS4.1 but since ABC dropped legacy view support I assume this is when it stopped working also:


General web browsing works well though:


MPlayer playback works well on Icaros with the 8800GT card, with 720p and some 1080p videos playing back well:


Some more photos (not screenshots) of videos running smoothly in full screen and windowed - 720p plays ok full screen, but not 1080p:


Despite the MPlayer version for AROS being older than the version for AmigaOS4.1, it works well enough.

I also tried out some games while in AROS that used the 2D and 3D capabilities, such as Voxel Bird Saga and Wings Battlefield (released in 2015):


I couldn't resist playing Giana Sister Reborn too:


I have also started working on the Amiga Forever integration process, but this is not finished yet:


The resolution in the emulation doesn't display properly for some reason and I have to run the emulation in 1024x768 to see the workbench, which doesn't work well with the 2500x1600 screen in AROS of course...work in progress!

Still plenty more work to go in setting up Icaros Desktop 2.0.3 on the Core i7 PC, but going well for the most part! USB drives work well, as does sound (via the onboard HD Audio) and networking with the 3Com card.


I was also glad to see the latest Odyssey 1.25 Beta on Icaros Desktop, and to see that YouTube videos are now back in the web browser again on NG Amiga systems :-)

Adelaide Amiga Meeting with new X1000

$
0
0
Today is my 40th birthday and I got the best present of all - my AmigaOne X1000 back and running! Oh, and I assembled it at the Adelaide Amiga meeting which was held last night :-)


I received the package from the UK yesterday afternoon at work, and so had to make some last minute changes to what I had planned to do at the Adelaide Amiga meeting so I could get the X1000 up and running for my birthday today!

Nonetheless myself and a friend (traksion - a former demo scener and part of the Amiga demo group The Experience I formed back in 1996) helped me to transport my Amiga 4000T, Sam460 and X1000 systems to the event, and to set them up.

The event last night had a special guest - Jonathan Potter, author of Directory Opus for Amiga, who had travelled from Melbourne to Adelaide to attend this meeting!


We got down to chatting about all things Amiga, what is happening with the Next Generation Amiga systems and a demo of some of the new features in AmigaOS 4.1, and of course the latest version of Directory Opus 5.91!


My attention was somewhat initially distracted by the need to assemble my X1000 at the event before I could show it - here is the new board:


In the meantime while I was working on that, my friend traksion had set up the Amiga 4000T and Sam 460 and got some 2015 demos running for people to watch:


As the Amiga 4000T is quite rare in Australia, people were very interested to look at the machine itself, maybe more than what was running on it!

Conversations was great, and it was refreshing to see more new faces at the meeting tonight that we hadn't seen before, as well as the regulars of course!


I apologise for the lack of photos of the event this time around but I was very busy getting the X1000 built again:


Here it is, almost ready for power on:


It lives! I have my X1000 back and working again! Very very happy about it!


Taking a quick look around the floor I noted that AmmoJammo had brought along his special Amiga 600, which has been upgraded with CF Card, ACA620 accelerator, an internal cd drive(!), and an internal power inverter and switch, meaning his A600 does not need a separate brick power supply! Very cool!


I wish I had more time to take a closer look at this machine internally - it looks amazing! :-)


Close up view of the power inverter internal to the A600 with a switch mounted on the side.


View of the cdrom drive (slot load) mounted into the rear of the case. I can only imagine how cramped it must be in the case itself!


There was certainly plenty of discussions tonight - as usual I talked from the minute I got there until I went home! :-)


A chameleon 64 was also again up and running, with the extra docking station connected to support standard joysticks. I use my Chameleon64 on my real C64 now, but it can also run as a C64 standalone like this:


My X1000 on the AmigaOS 4.1 Final Edition Workbench screen - I brought the latest issue I have of Amiga Future to show people at the meeting:


I was also discussed all things demo scene with a visitor from overseas! She gave me her email address so we can talk more later, but she is focused on the demo scene history and was interested to learn more about The Experience and the demos we did for the Amiga 1200 in the late 1990's!

As part of the X1000 rebuild last night, I also installed a Warp3D Southern Islands compatible video card (R9 250X) I bought from Amigakit a while ago after I discovered the 270X didn't work.

The new card worked straight away and I quickly had Warp3D demos running on the X1000 - running so much faster than they did on the Sam 460 :-)


Jonathan was surprised to see there is still considerable activity in the Next Generation Amiga community to push forward AmigaOS 4.1 functionality and new applications, and especially having the X1000, AMIStore app store, modern Internet functionality and the Warp3D Southern Island with Radeon HD card capabilities too.


I am glad whenever I can surprise people with the news that Amiga is not just stuck in the retro past and still has an interesting future with new hardware and new operating system and applications in 2015!


I am very glad to have my X1000 back up and running again, just in time for my 40th Birthday today!

My advice to X1000 owners is to take care of your machines, leave CFE alone, use UPS protection for the system to protect against power supply cuts, and keep in mind that repairs or replacements (as in my case) can take a long time.  In my case almost 6 months.

In my case the CPU on the X1000 failed, and because it is surface mounted, it cannot be repaired for much less than replacing the system itself. I decided to replace it with a new board, offered to me at a good price which I was very grateful for.

Back to the Adelaide Amiga meeting, Andrew was again busy explaining more about the history of Phoenix Microtechnologies:


Boxx2 and Great Giana sisters turned out to be quite popular and played by quite a few people present.


I also ran some OS3 applications natively on the X1000. In addition I also showed AGA demos on the X1000 using JIT UAE and on the A4000T side by side to show that the X1000 can run the same software just as well as the original systems.

The Adelaide Amiga meeting was a great night again, and I was glad to be able to attend and be part of it. I was also glad to meet some new people there and speak with Jonathan Potter too!

Looking forward to the next meeting! Hope to see some of you there next time!


Computer Room reconfiguration and NG Amiga games

$
0
0
This weekend I was busy reconstructing my computer room desk area after pulling it apart for the Adelaide Amiga meeting on Monday. With my X1000 now returned, and the addition of the Icaros setup on the Core i7 PC, CDTV and a Sam460CR, I needed to find a way to fit them into a small space.


Adding extra monitors is not an option for me due to space, so I found a solution with my LG 24" TFT screen, as it has VGA, DVI and HDMI inputs which are switchable from the front panel.

I was using that screen paired with another identical screen on the X1000 as a dual display, but with Warp3D SI now working through the main card on the X1000 now, I no longer need two screens on it. I needed that spare screen for this project:


After some other work done on this weekend, the Core i7 PC now has two graphics cards in it - a Geforce 8800GT for Icaros, and a ATI Radeon 270X for Windows 10. Windows 10 can use both cards of course (so dual screen), while the Icaros setup can only use the Geforce 8800GT card. I covered more about my Icaros 2.0.3 setup on this Core i7 PC here. So now I can boot either one without swapping cables or hardware! :-)

The Geforce 8800GT card is now connected to the VGA input on the LG screen.


I used the opportunity to play some 3D games on Icaros 2.0.3 that I got working earlier this weekend also. (click to expand any pictures)


Return to Castle Wolfenstein on Icaros 2.0.3:


Played this game originally on PC and never thought I would see this game on a NG Amiga system, but here it is:


Duke Nukem 3D on Icaros 2.0.3:


Aquaria on Icaros 2.0.3:


A work in progress is Doom 3 on Icaros 2.0.3, which at the moment only gets as far as the title screen.

Update 14/9/2015 - I now have Doom 3 working on Icaros 2.0.3! To help out other people, I got it working by installing Doom 3 on Windows 10, then updating to the latest 1.3.1 patch. Once done I copied the Doom3 folder from Windows 10 and transferred it into the ADoom3 drawer in Icaros.

To do this from within Icaros (avoiding USB drives) I needed to copy the NTFS driver from Icaros Storage/L drawer to L: as below. After a reboot I could then see the NTFS drives on my system, including the Windows 10 drive to copy the files I needed.

Once done the game now works!


In the screenshot below you can see the Disk type is NTFS. As a last step I changed the default Icaros Theme in Preferences to use a AmigaOS 4 style theme, as I prefer the look:


I now include some more photos from Doom 3, running on Icaros 2.0.3!


It is so hard to believe we have this game running on a NG Amiga system - how awesome!


Performance does slow down a bit when a lot is happening, but nonetheless it runs well in the default settings!


Maybe if I adjust the settings a bit I can get it more optimal, but it is impressive as it is! Doom 3 on NG Amiga - who would have thought! :-)

Let's move on to the Amiga CDTV side of things now!

The CDTV has AV out only, which led to my purchase this weekend at Jaycar (Electronics store in Adelaide) of a AV to HDMI 1080p upscaler box and associated HDMI and Audio cables!


Here is a close up of the AV to HDMI upscaler. It is powered from USB port connector, with power supply included. It also can use 720p instead of 1080p. Why you would want to use 720p I have no idea - does anyone have a 720p only HDMI display these days?


Pretty soon I had the CDTV hooked up the HDMI input on the screen.  It looks great.


I didn't connect the audio to the upscaler because I am not connecting it to a TV (which would have it's own sound output). Instead I fed the audio from the CDTV separately to a audio switch box that is connected to a subwoofer and speakers. I used this same switch box when I exhibited at AmiWest 2014 last year.


Here is the CDTV playing back Immortal 4, the remixed Amiga game tune CD - the speakers are hidden behind the screen due to space constraints:


I also got a HDMI switcher box (with remote), which allows me to switch up to three HDMI inputs.


This doesn't need external power and I am using it to switch between the CDTV HDMI output and a separate VidOn.Me Android Media box I received a while back for free (came with a DVDFab software purchase) but never used until now. It also has HDMI out.

The VidOn.Me box is very compact, with wireless support and I have attached a USB hard disk on top with various videos and music to play on it:


VidOn.Me in action on the LG 24" screen, switched from the CDTV using the button on the HDMI switcher:


Playing back 1080p videos works a treat. I look forward to being able to do this on my NG Amiga systems soon too hopefully :-)


The final part was to squeeze in the Sam 460CR system in between the LG screen and the C64, and hook it up to the DVI input on the LG monitor - it only just fits but hey - it fits! I removed the CDTV keyboard (as it isn't needed to use it) and replaced it with the AmigaOne keyboard and mouse for the Sam 460CR.

The Sam460CR's audio is also put into the audio switch box, along with the CDTV, VidOn.Me and C64. All full up.


All done!

With an eye watering amount of electricity running, I quickly grab a shot of all of the machines in action before returning my usage to a sane level!


The MacBook Pro is running AmigaOS4.1 Classic emulation under FS-UAE on the 30" screen, which along with the audio, keyboard and mouse is shared with the Core i7 PC via a separate DVI-D switch box (needed to support 2560x1600 screen mode for the 30" screen).

As you can see it is a tight fit indeed, but it works, with enough room to use the keyboards on all the systems without moving things around:


Alternate view showing the X1000 on the left, A4000T, MacBook Pro, Core i7 PC, CDTV, VidOn.Me, SAM460CR and C64.


I was so tired after getting all this done, but I think the end result was worth the effort!

I know other people have much more impressive and bigger computer areas with far more computers than me, but I am happy with it as it is right now.

That said, I am forever tinkering with the setup as I take on new projects, so I definitely won't say it will remain like this!

Also, this weekend I was relaxing with the X1000, and getting some accelerated games working on it has been great also!


For those curious, the Tetris light thing was a present for my birthday, and can be reconfigured in any number of ways by placing the Tetris however you want - power is connected to each piece via the Tetris piece edges which transmit power when touching another piece. You can buy them from Thinkgeek.com.

Here is Quake 3 Arena running beautifully on AmigaOS 4.1 Final Edition X1000 with Warp3D Southern Island and Radeon HD 2.10 drivers:


Some Warp3D demo time on my X1000 courtesy of demo group Universe:


GL Hexen 2 running perfectly on the X1000:


It has been fun this weekend, tinkering with AmigaOS 4.1 Final Edition on X1000, Sam 460, CDTV, Icaros 2.0.3 on Core i7 PC.

Amiga systems in NG or Classic form are still a lot of fun in 2015!


AmiCraft Beta 3 for AmigaOS 4.1 on X1000

$
0
0
Today I am taking a look at the recently released game called AmiCraft (in Beta 3 form) for AmigaOS 4.1 on my X1000.


AmiCraft is a game based on the very popular Minecraft game, released on Windows, Mac, PS4, Xbox and other formats too since 2011.

It is great to see this game on AmigaOS 4.1!

AmiCraft is currently in Beta 3 form, and available for download from OS4 Depot here. Once downloaded and extracted you get the following drawer:


When running AmiCraft, it prompts you to select the screen resolution, full screen or window mode, and how far into the distance to render the view. These settings would probably need to vary if you ran a Sam 460, but today I am testing on the X1000 so I use the full 1080p resolution!


The title screen is plain, but allows you to change the keyboard shortcuts to move around the map, the craft menu, and the jump command:


The game itself starts based on a randomly generated map, with your character initially having no possessions and a full health bar that is reduced when attacked by creatures like Spiders and zombies! The game is running in Survival mode, where the aim is to survive - one of the modes in the original Minecraft that it is based on.


The blocky nature of the 3D tiles that make up the AmiCraft map is the same as what is done in the Minecraft game it is based on, and is quite deliberate.


The mouse acts as the directional view, the mouse button is used to use whatever you have in your inventory, and the scroll wheel moves between items in your inventory.


You can alter the AmiCraft landscape where you see the black outline appear on the map, as you move the mouse around the landscape in front of you (the crosshair pointer marks the location you are looking at). Here I can remove a tile from the ground:


By clicking the left mouse and holding it, I begin digging at the tile until it is removed:


Pressing E, I can access the menu to make implements and weapons to help me through the map. These allow me to kill enemies more easily, dig faster, etc:


It is necessary to collect resources to craft these items. By clicking on them you can see what resources are needed to be collected from the map in order to ctraft them.

There are friendly creatures like cows, sheep, etc, dotted around the map that will not try to kill you. They can be killed for food.


Looking around the maps some more reveals some underground cave systems.  In here you will find spiders, Zombies and other nasties waiting for you...it is certainly dark!


It didn't take long for a Zombie to take me out:


When you are killed you are respawned back on the map.

After some more time I have collected some items around the map:


Day turns to night and back to day around every 20 minutes of game time. At night time more enemies appear randomly on the map to be avoided or attacked.

You can collect resources like wood by removing tiles that make up the trees on the maps. I show this below. Move close to the tree and remove each tile with the mouse.


As this is done, resources fall in the form of small objects you can walk over to collect.


Eventually you can remove all the tiles of the tree, releasing all of it's resources. Below is the last piece of the tree trunk - the resources of wood released are hovering above it, and will drop to the ground once the last piece is removed for easy collection.


The more I played the game, the more I got into it. I do miss not having any ambient music, but hopefully that will come later.


Below I have made the Crafting table, that is needed to make other objects in the game:


There is a lot to this game, and it really does look like a lot of fun to play. This is my first time to play Minecraft style game, and I am glad to play it on my X1000!

The map is smooth to walk around - I didn't notice any real slowness, but note that I haven't played the original Minecraft to compare it to. I think some background ambient music in AmiCraft would really help and add to the game.

After playing AmiCraft on the X1000, I can really understand why a new generation of teenagers are really getting into Minecraft now.

AmiCraft is a lot of fun, free to download, and recommended to try out!


Hollywood 6 for AmigaOS 4 on X1000

$
0
0

Today I wanted to take a look at Hollywood 6.0 on AmigaOS 4.1 Final Edition on my X1000, which was released in 2015. I will also take a look at the updated Hollywood Plugin for Cubic IDE and a quick look at FastView as well!


Hollywood 6.0 is a commercial product made by Andreas Falkenhahn, and is available to purchase on his website here for 99 Euros, or cheaper if bundled with Designer 4.0 or as an upgrade from an older version.

I looked at Hollywood Designer 4.0 previously (along with Codebench) in a previous blog post here last year, but today I wanted to have a look at the upgraded Hollywood Version 6.

It is great to have programming languages for AmigaOS 4.1 that are more accessible to non-professional programmers like myself! :-)

After purchasing, downloading and putting together the ISO for the installation as per the instructions, I then ran the installation from the ISO, mounted with DiskImageGUI under AmigaOS4.1 on my X1000:


Interesting is that you must run Hollywood 6 on a screen greater than 256 colours, which means it no longer works on Classic Amiga systems without a graphics card installed.


My previous Version 5 installation is picked up by the installer and I am prompted to update it:


Note that the "upgrade" will actually delete everything in your current installation - you are warned of this. In my case I keep my projects in a separate drawer so it is ok to proceed:


Make sure to choose AmigaOS 4 here, since I am installing it on the X1000:


Once the files are copied across the intro will then play:


When you close it the installer provides information about how to compile Hollywood 6 programs from the Shell. I plan to use Cubic IDE with the hollywood plugin to edit/compile my code for Hollywood:


The CTRL-C shortcut to kill a Hollywood program is a good tip to remember:


Installation is completed successfully:


After closing the installer, another Hollywood program runs to show the new features in Hollywood 6, as below:


There are so many plugins for Hollywood offering lots of extra functionality now!


The information  about Radeon HD support for video drawing and scaling for better X1000 performance is very welcome!


Having installed Hollywood, the next thing I needed to do was update my Hollywood Plugin for Cubic IDE. Cubic IDE is a full featured Development Environment for AmigaOS and is available for purchase for 44.90 Euro here. It is my choice of editor for most things under AmigaOS4.1, including Hollywood programs I am working on.

You don't have to use Cubic IDE to edit Hollywood scripts of course, any text editor will do the job. But Cubic IDE has many great features and I believed it worth the price to have every programming project I am going to edit integrated in one application with syntax highlighting, context help and more, plus edit/preview/compile functions.

You can download the Hollywood 6 plugin for Cubic IDE from the Hollywood download page here. Here is the extracted archive to install:


The info document doesn't say much, the installation is straightforward - obviously you need Cubic IDE installed before you do it:


As this is updating an older installation of the plugin - it will let you know and prompt to replace the files. I click Yes to All here so it doesn't prompt for every new file:


Installation completed:


After rebooting the system, I then download all of the Hollywood plugins available for AmigaOS 4.1 and then install them all! They are all available on the Hollywood download page here. Would love an installer that would just install all of them in one go! :-)


I then run Cubic IDE, and I can see the Hollywood plugins in the toolbar and menu options available. This plugin includes syntax highlighting, command structures and help as you go - click to expand these pictures:


The link to the Tutorial to get started in Hollywood prompts me to actually try it out!

You can see the various Compile options, allowing me to compile Hollywood programs for AmigaOS3, AmigaOS4, AROS, MorphOS, MacOS, Windows too! This program is multi-platform and your compiled Hollywood scripts can be chosen to run on many different platforms!


You can also Run a Hollywood program from within the editor, in window or full screen without creating an executable - very handy to try out changes quickly (as below):


Here is the full Hollywood Amigaguide manual - it is an excellent resource and clearly a lot of work has gone into writing it:


Suitably inspired now to give Hollywood 6 a go, I create a drawer in my Hollywood_Projects drawer called HelloWorld:


I then create my base .hws script called Helloworld.hws (incorrectly called .hwp in the initial screenshots sorry) into that drawer. I then get to work on writing my Hello world program as shown in the tutorial:


Here is the resulting program when I run it from Cubic IDE:


It exits when you click the left mouse button (due to the WaitForLeftMouse() call in the script), or the close gadget or CTRL-C.

Not very exciting, but a start nonetheless! Next, I fired up FastView to look for a test background image from my collection to try out. FastView is part of the zTools suite available for purchase for AmigaOS 4.1 on AMIStore)


The image I selected is a photo I took of a Bento lunch my wife made for me last year! One problem of course is the images taken with the camera are too high resolution for the window they will run in. This is why I ran FastView, as it allows me to quickly resize it.

After selecting the image in Fast View, I then select the Options tab below the picture preview, modify the pixels next to Rescale to the size I want, or select a % zoom (in this case I selected 25%) and then click on Rescale  (as shown below):


This then produces a separate JPG file appended with .SCALE, which I can then click Open Drawer in Fast View to be taken directly to the drawer containing the file. Given the messy structure iPhoto uses to store photos (where I copied the photos from originally) this feature is very helpful indeed:


This is great as I can then quickly copy it to the HelloWorld drawer for my project!

I then modify my Hollywood code to support the background picture, which is as simple as typing:

@BGPIC 1, "file" 

I love the simplicity! You can also add comments to your code with /* */ or with ;


I then run the program and it works straight away!


Next I want to create an executable for AmigaOS4.1, which as shown earlier I can access from the Cubic IDE toolbar using the Hollywood 6 plugin:


It then prompts for the name of the program executable, which will be HelloWorld:


The compilation then gets underway - the status can be seen in the bottom Output pane of Cubic IDE:


I then have an executable program I can run on AmigaOS4.1. My first program in Hollywood 6!


I am not leaving it there though - I still want to try some more things out.

I first fixed the .hwp extension in my HelloWorld script to .hws as this is a Hollywood Script (hws), not Hollywood Plugin (hwp)! That was a silly mistake!

Next I copied one of my songs as an MP3 file (originally tracked by myself in Impulse Tracker) into the HelloWorld drawer, and preload with:

@MUSIC 1, "file" 

This preloads the file (assumed to be in the same drawer as the script) into the executable with ID 1, which means you get one program without dependent files needed in the drawer after compilation. I then add PlayMusic(1) to play the music in the background - how easy is that!


I then comment out the original Print line and use a function I read in the manual called TextOut, which allows me to place text at particular x and y locations on the screen. I can also specify #CENTER as the location, which will automatically centre my text on the window size the program is running in. This is more flexible as it is size independent:


Here is the resulting program:


Next I want to change the font - in Hollywood you can use True Type fonts (TTF) or Bitmap Amiga fonts. Using Amiga fonts is easier, and you can choose to include the font with the program (bad idea) or reference an existing AmigaOS 4.1 font. Remember that if you compile for other platforms the font needs to be available there too if you want to look right.  In that case bundling the font may make sense, but remember there are licensing considerations if you include fonts in your programs...

In my case I am just playing around, so I look at the fonts under AmigaOS 4.1 using the Fonts Prefs tool:

 I then added in the SetFont and SetFontColor definitions to set the font to DejaVu Serif Bold, size 32. Note that the font name is case sensitive and the font size must exist in the fonts drawer or you will get an error when trying to run the program.

At this point I also invoke Layers, which allows me to create objects like boxes, etc, that can be placed and moved/rotated around the screen as needed. This is done by typing into the script:

EnableLayers()

The Box command is also added, to enable me to create a filled box over the image, that the text will then be displayed in. The Box is called with:

Box(x,y, size_x, size_y, colour, table options)

In my case I added the option {RoundLevel = 25} to get the Box drawn to have rounded corners that are 25% of the box size.

If you are wondering where I found this stuff out, I had no idea either initially. I was just looking around in the manual at the various sections on displaying fonts, etc and stumbled on various commands to do things and tried them out to see what they did!

As a final thing I also found a neat feature that allows you to create a Gradient fill for your box, using SetFillStyle before creating the box, to set the parameters for the fill - in my case a Linear Gradient, going from Black to Blue.

Putting this all together (with comments) in the revised script, it now looks like this:


I also chose a different picture (of the Nagoya Railway Museum) and rescaled it using FastView to 1920x1080 so it would look nice when run in full screen.

The resulting program looks like this:


I haven't even begun to scratch the surface of what is possible with Hollywood 6, but this initial play with it has convinced me to push forward with trying to code some different projects of my own!

Stay tuned, more info will come as my various dream projects can be met by my slowly improving coding skills as time permits! I will also take a close look at the cross compatibility angle in a future blog entry.

Hopefully this gives you some insight into the product and how easy it is to do things!

Hollywood 6 is a very interesting product and is recommended for those who want to make programs for AmigaOS 4.1 (Mac, Windows or other Amiga platforms too), but are not professional coders!

Viewing all 215 articles
Browse latest View live